Add a New Case
There are three ways to create a new case within Axon: from the Case List, from Search results, and using Rule Builder.
Each method of creating a case is described below.
Add a New Case from the Case List
A new case can be created from scratch from within the Case List.
To add a new case from the Case List:
At the top-right corner of the page, click New Case.
The Create New Case window appears.Enter the following information for the case:
Field | Description | |
|---|---|---|
Name | Enter a brief title for the case. Each case is also automatically assigned an internal Case ID by Axon, which cannot be changed. | |
Status | Open the drop-list and select a status for your case from the options below: | |
New | This is a new case on which work has not yet begun. | |
In Progress | This case is currently being worked. | |
Waiting | This case is waiting on more information, more logs, direction from management, etc. | |
Closed - False Positive | This case has been closed and marked as a false positive - after research, it was determined that the attached logs did not pose a threat. | |
Closed - No Action | This case has been closed and no further action will be taken, or no action is currently required. | |
Closed - Resolved | This case has been closed and the issue presented by the case has been fully resolved. | |
Severity | Open the drop-list and select a severity for your case from the options below: | |
No Severity | Select this option if there is not yet a priority assigned or if you are unsure of the priority. | |
Low | This case has low priority. | |
Medium | This case has moderate or normal priority. | |
High | This case has high priority. | |
Critical | This case is critical and has the highest possible priority. | |
Owner | Open the drop-list and select the email address of an Axon user to make them the owner of this case. Alternatively, click the Assign to Me button to automatically select your own email address from the list. The owner will receive an email notifying them of the case once it is saved. | |
Description | Enter a detailed description of this case, including the purpose of the case. | |
Click Create Case.
The case is successfully added to the top of the Case List.
Click the case in the Case List to open the Case Details. For more information on the Case Details page, including how to add logs to this new case, see Manage Cases.
Add a New Case from Search Results
A new case can be created by selecting one or more logs from a list of Search results.
To add a new case using search results:
Execute a Search as normal.
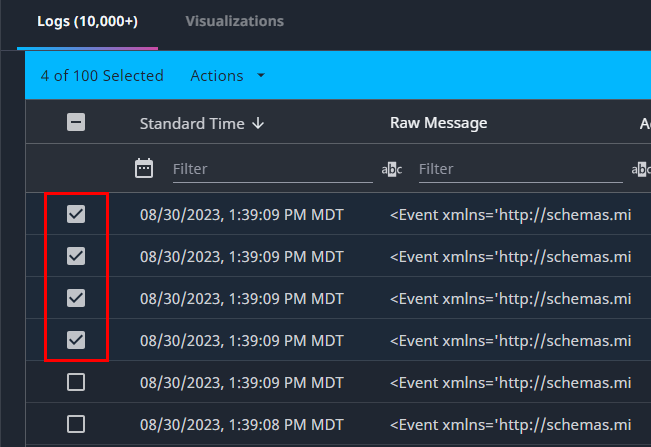
In the left-hand column of the search results, check each log to be included in the new case.

In the blue bar at the top of the search results, click Actions.
In the drop-list, click Add to New Case.
For information on adding logs to existing cases, see Manage Cases.
Enter the following information about the new case:
Field | Description | |
|---|---|---|
Name | Enter a brief title for the case. Each case is also automatically assigned an internal Case ID by Axon, which cannot be changed. | |
Status | Open the drop-list and select a status for your case from the options below: | |
New | This is a new case on which work has not yet begun. | |
In Progress | This case is currently being worked. | |
Waiting | This case is waiting on more information, more logs, direction from management, etc. | |
Closed - False Positive | This case has been closed and marked as a false positive - after research, it was determined that the attached logs did not pose a threat. | |
Closed - No Action | This case has been closed and no further action will be taken, or no action is currently required. | |
Closed - Resolved | This case has been closed and the issue presented by the case has been fully resolved. | |
Severity | Open the drop-list and select a severity for your case from the options below: | |
No Severity | Select this option if there is not yet a priority assigned or if you are unsure of the priority. | |
Low | This case has low priority. | |
Medium | This case has moderate or normal priority. | |
High | This case has high priority. | |
Critical | This case is critical and has the highest possible priority. | |
Owner | Open the drop-list and select the email address of an Axon user to make them the owner of this case. Alternatively, click the Assign to Me button to automatically select your own email address from the list. The owner will receive an email notifying them of the case once it is saved. | |
Description | Enter a detailed description of this case, including the purpose of the case. | |
Log Group Description | Enter a detailed description about the logs you selected to be included in this case. | |
Click Create Case.
The case is successfully created, and can be viewed in the Case List.
Click the case in the Case List to open the Case Details. For more information on the Case Details page, including how to add more logs to this new case, see Manage Cases.
Automatically Create & Update Cases with Rule Builder
Only administrators can create and modify rules to automatically create cases.
A case can be created or updated by configuring a rule within Rule Builder to automatically create or update a new case each time the rule is triggered.
To determine whether Axon creates a new case or updates an existing case when a rule that has case creation enabled fires, Axon considers the following:
Are there any cases with an Open status that were created by the same rule firing?
If yes, Axon evaluates the “group by” fields of the rule.
If all of the “group by” fields match exactly, then the triggering logs are added to the existing open case.
If the “group by” fields do not exactly match, then a new case is created and the triggering logs are added to that new case.
To configure a rule to create a new case each time it fires:
From the Dashboard, click the Admin cog at the bottom-left.
Under the Analytics header, click Rules.
The Rules page opens.Do one of the following:
To modify an existing rule, click the three-dot menu to the left of the rule and select Edit Rule.
To create a new rule, click the Actions menu at the top-right of the screen, and then click Add Rule.
Create or modify the rule as normal, using the instructions provided in Rule Builder.
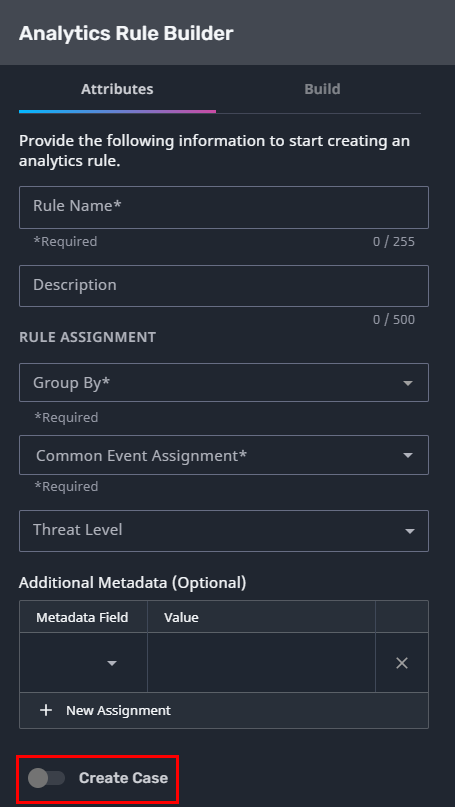
At the bottom of the Attributes tab, click the Create Case toggle to enable case creation for the rule.

Enter the following details:
Field | Description | |
|---|---|---|
Case Name Generation | Select one of the following options to determine how cases created as a result of this rule will be named: | |
Automatic | Case names are automatically generated using the rule name, date, and time of creation. | |
Manual | Select Manual and enter a Case Name to be used for all cases created as a result of this rule. | |
Description | Enter a detailed description to be used for all cases created as a result of this rule. | |
Owner | Open the drop-list and select the email address of the Axon user who should be the owner of all cases created as a result of this rule. The owner will receive an email notifying them of each case that is created. | |
Cases created using this method are automatically given a status of New and a severity of Medium.
Finish creating or modifying the rule as normal.
Cases will be automatically generated each time the rule is triggered.
Click one of the automatically generated cases in the Case List to open the Case Details. For more information on the Case Details page, including how to add more logs to each new case, see Manage Cases.
