Users can run searches from multiple places within Axon:
Search bar at the top of all pages
Search page accessed on the left navigation bar
Within widgets on the Dashboard
Search Page
To access the Search page:
In the left navigation bar, click the search icon. If you have not run any searches, the page will appear with no tabs.
To start a new search, click the blue + in the upper-left corner. A New Search tab opens. By default, the Search History table appears. The New Search tab shows the following information:
Item
Description
Search bar
Click in the bar to begin building a new search. A list of recent searches will also appear.
Search History
Click the search icon to rerun the search query in that row.
Click the edit icon to modify the search query in that row.
Right-click a search query to copy it.
Saved Searches
Click the search icon to rerun the saved search in that row.
Click the configure icon to change search settings or schedule reporting for the saved search.
Click the trash bin icon to delete the saved search in that row.
Right-click a search query to copy it.
After running one or more searches, the Search page displays each search in a new tab. A tab containing a completed search shows the following information:
Item
Description
Search bar
The search bar shows the search query.
Trend graph
The trend graph of the search results shows a trend of the logs received over the last 24 hours.
Logs
The search results displayed in a grid.
To change the columns that display in the grid, click the columns menu on the right side, and then select desired attributes and deselect unwanted attributes.
To export the data, click the download icon, and then click Download.
Some results in the grid may be marked with one of the following icons:
or .
These icons denote results that are Observations or Observation Clusters, respectively. For more information, refer to the Observations or Clusters topics.
Visualizations
The search results displayed as widgets.
Search Results Panels
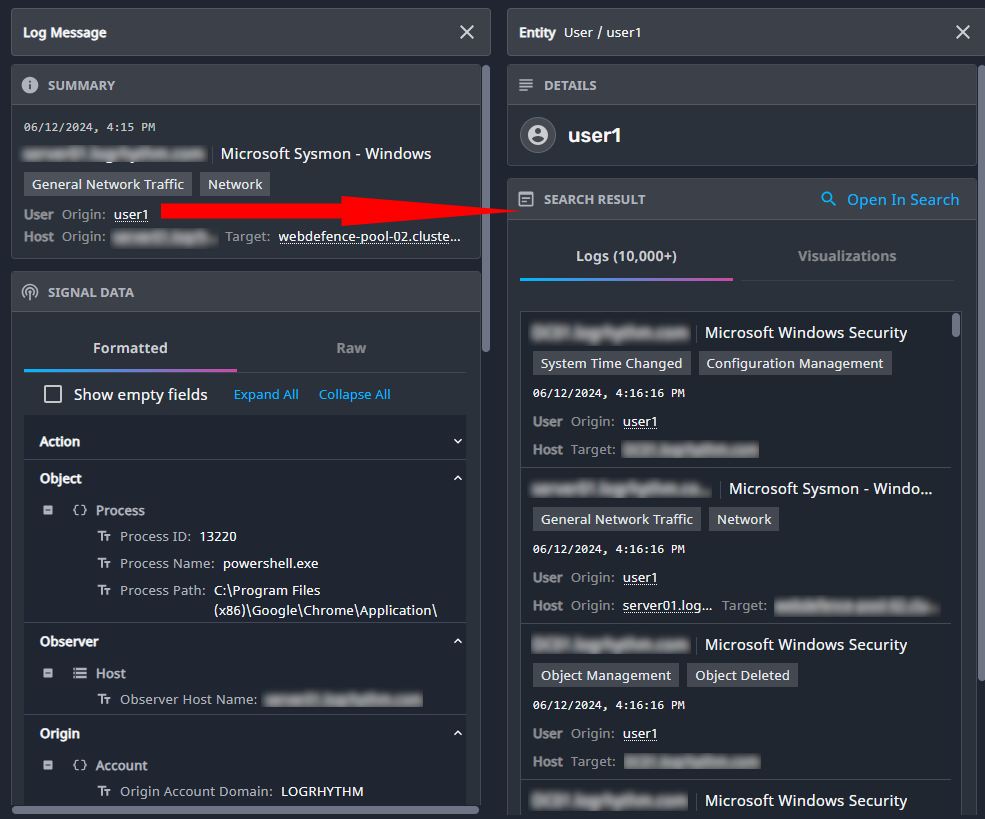
For ease of use, drilling down on a log in a search result opens a Log Message panel that displays Summary information about the log, as well as the Inspector for that result.
Additionally, when the log message contains User or Host information, drilling down on this information opens a further panel showing all logs that contain that user or host. With this functionality, you can drill into suspicious hosts or users and determine if there are repeated threats being detected coming from a single source.
For more information on using and navigating these panels and the inspector, refer to the Search Results Grid Inspector topic.
Search Date and Time
The date and time picker, located to the left of any Search bar, allows you to determine the time period for which the search displays results. By default, searches show results for the last 24 hours.
To adjust the date and time period for which searches display results, refer to Date and Time Picker.
Search Settings
In the Quick Search bar, click the Settings icon to display Axon Search options.
The following search settings are available:
Option
Description
Copy Query String
Click to copy the query string currently entered in the Quick Search bar to allow for easy pasting elsewhere within Axon.
Use Assisted Search
Click the toggle to enable or disable Assisted Search functionality within the Quick Search bar.
Assisted Search
The assisted search functionality can help you build a search query without needing to put together the syntax yourself.
Composing a search query with assisted search still requires a basic understanding of how to Build a Search Query.
To use assisted search, do the following:
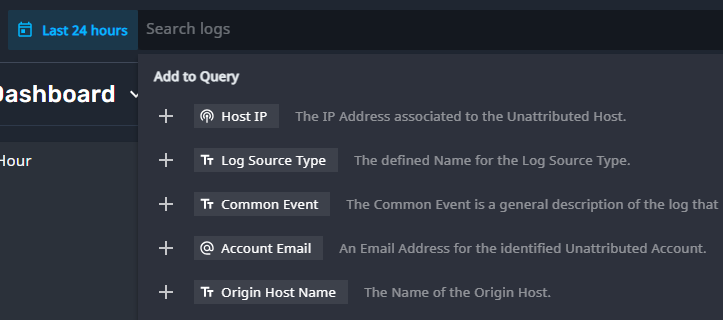
With the Use Assisted Search toggle enabled, click within the search bar. A drop-down of popular filters and their descriptions appears. At the bottom of the drop-down are the five most recent searches.
Select one of the suggestions from the Add to Query list, or begin typing the name of any field or filter you'd like to include in your search syntax, and select the desired result from the suggestions list.
A minimum of three characters must be entered before suggestions appear.
For example, type Log and select Log Source from the list that populates.
Open the drop-list and select one of the Operators to filter by.
Depending on the first item selected, this drop-list could default to a variety of operators.
For example, select CONTAINS ... to search for logs that contain a specified word or character in the selected field.
Enter the word or term to search for using your filter. For example, enter Firewall to search for Log Sources that contain the term Firewall. The completed search query should look like this:
CODE
Log Source CONTAINS ... Firewall
(Optional.) While your cursor is still in the box from the previous step, press Tab on your keyboard or click the + icon to continue adding on to the search query. By default, the next operator is AND. Optionally, click on AND to change the operator to OR. For example, press tab while your cursor is in the box where you typed Firewall to start a new query within the same search.
(Optional.) Repeat steps 2 through 4, adding an additional clause to your search query. For example, configure the clause so that the Log Source does not contain the term Signal. The completed search query should look like this:
CODE
Log Source CONTAINS ... Firewall AND Log Source DOES NOT CONTAIN ... Signal
Press Enter or click the search icon to execute the search.
The search results display in a separate tab.
Assisted Search Actions
Each filter and field used when creating a query using assisted search includes an actions menu, which can be accessed by clicking the icon to the left of the filter or field.
In the screenshot below, the icons that open the actions menu for each field are highlighted in yellow:
The following items display in the assisted search actions menu:
Action/Field
Description
Create New Group
Click to add a new clause to your search query, separated by the AND operator.
Delete Clause
Click to delete the currently selected clause.
Field Name
Displays the common name of the field or filter selected, as well as the canonical ID used in the Axon Data Schema Guide.
Field Description
Displays a brief description of the field or filter selected.
Assisted Search Tips
The following table contains information about using Assisted Search to build queries containing certain fields, filters, or operators. There are innumerable ways to build a query using assisted search; this table provides helpful information for some of the more specific searches you may be looking to perform.
Query
Information
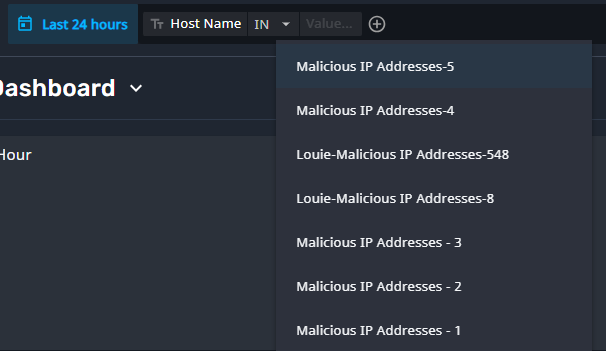
Lists
To use assisted search with Lists, you must use the operators IN or NOT IN. Lists that match the initial field selected display in a drop-down once the operator is selected.
In the example below, the initial field of Host Name is selected. Once the operator IN is chosen, the final field drops down and displays all lists that contain a string-type column. Start typing the name of a list to filter the results. From this drop-list, the desired list can be selected.
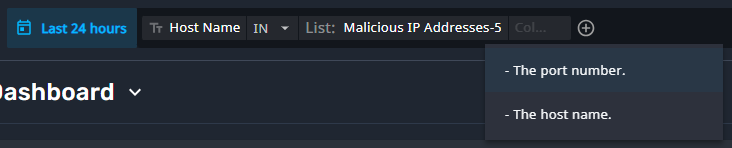
Once a list is selected, another field appears with a drop-list displaying relevant columns within the list. Select the desired column to be included in the search.
Account Email
When the initial selected field is Account Email, you can select the CONTAINS operator to search specifically for unattributed emails containing the value entered.
In the example below, entering the value "gmail" shows all unattributed emails from the Gmail host.
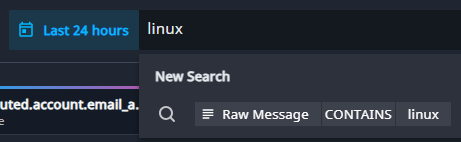
Raw Message
Enter any string in the search bar with assisted search enabled to automatically populate a search suggestion for raw messages containing the entered string.
In the example below, typing "linux" into the search bar populates a suggestion to search for all raw messages containing the term "linux."
Auto-Refresh a Search
Search results can be updated in near real time, so as to track the ongoing events and validate collection and normalization of new log sources.
Auto-Refresh Specifications
Auto-refresh can be enabled at the press of a button. The time frame of these search results is not a sliding window, but starts with the earliest time in the search criteria time range, and always ends with "now." For more information on configuring the search criteria time range, see Build a Query.
The auto-refresh interval varies depending on the time frame selected:
Time Range
Refresh Interval
Under 2 hours (between now and 2 hours ago)
5 seconds
Between 2 hours and 24 hours
15 seconds
More than 24 hours
30 seconds
Enable Auto-Refresh
On the left-side menu, click theSearch icon. The Search window appears.
Execute any search query. The results grid appears.
Click the Resume auto-refresh icon in the middle-right of the search window. Auto-refresh is enabled for the search grid & visualizations.
Auto-refresh is automatically paused when the user navigates away from the search page, and resumes when they return. However, the search is not paused if the window is not the active window.
Disable Auto-Refresh
On the Search page, execute any search query. The results grid appears.
Click the Pause auto-refresh icon in the middle-right of the search window. Auto-refresh is disabled for the search grid & visualizations.
Auto-refresh is also disabled after five minutes of inactivity. A pop-up notification informs the user when the auto-refresh has timed out.
Available Actions on the Search Page
What do you want to do?
How do you do it?
Start a new search.
In the upper-left corner, click the blue +.
Close a search tab.
Point to the tab you want to close, and then click the gray X.
Close all search tabs.
In the upper-right corner, click the blue number framed in a blue box, and then click Close all.
Close all completed searches.
In the upper-right corner, click the blue number framed in a blue box, and then click Close completed.
Close all in-progress searches.
In the upper-right corner, click the blue number framed in a blue box, and then click Close in-progress.
Close search tabs that have no results.
In the upper-right corner, click the blue number framed in a blue box, and then click Close tabs without results.
View Search History.
In the upper-right corner, click the blue number framed in a blue box, and then click View Search History.
Save a search after running it.
To the right of the search query, click the three-dot menu, and then click Save Search.
View a list of saved searches.
To the right of the search query, click the three-dot menu, and then click View Saved Searches.
Schedule a report based on the search.
To the right of the search query, click the three-dot menu, and then click Schedule Reporting.
Export a PDF report of the search.
To the right of the search query, click the three-dot menu, and then click Export PDF Report.
JavaScript errors detected
Please note, these errors can depend on your browser setup.
If this problem persists, please contact our support.