Gen5 Windows Appliance Hardware Installation
This guide will help you install your LogRhythm Windows Appliance and direct you to additional information. This guide applies to the following LogRhythm Appliances:
- Platform Manager (PM)
- Data Processor (DP)
- All-In-One Appliance (XM)
- AI Engine (AIE)
- Data Collector (DC)
- Web Console (WC)
For the LogRhythm Storage Array, see Gen5 Storage Array Configuration.
For the Linux-based Data Indexer, see Gen5 Data Indexer Appliance Hardware Installation.
Unpack the Appliance
Unpack your appliance, keeping all shipping materials in case you need them later.
Your LogRhythm Appliance ships with a rack-mount chassis and rails for installing the appliance in a high-density server rack. Depending on your appliance, the rack kit includes some or all of the following:
- One pair of sliding rail assemblies
- Nylon Velcro straps
Install the Appliance in a Server Rack
For additional information about installing the rails, installing the appliance, and routing cables, see the the rack Installation Instructions that are included with your LogRhythm Appliance.
Before you install the appliance, make sure that your rack meets the following specifications:
- American National Standards Institute (ANSI)/Electronic Industries Association (EIA) standard 310-D-92
- International Electrotechnical Commission (IEC) 297
- Deutsche Industrie Norm (DIN) 41494
Power on the Appliance
Your new LogRhythm Appliance is equipped with a redundant power supply configuration, which consists of two individual hot-swap components. For hot-swapping to occur, each of the two power supplies must be powered with its own cord. LogRhythm recommends using a fault-tolerant power source, such as an Uninterrupted Power Supply (UPS).
- Connect the power cables.
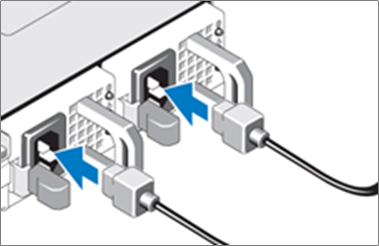
- Bend the system power cable into a loop as shown below, then secure the cable in the provided strap.
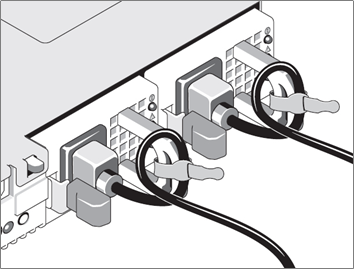
- Plug the other end of the cables into a grounded electrical outlet or a separate power source, such as an Uninterrupted Power Supply (UPS) or a Power Distribution Unit (PDU).
- Turn on the system by pressing the power button.
The power indicators should light up.
Booting the Appliance for the First Time
Your new LogRhythm Appliance comes from the factory pre-installed with:
- Microsoft Windows Server 2019 Standard
- Microsoft SQL Server 2019 Standard 64-bit (for PMs and XMs only)
- LogRhythm Software
Microsoft Windows is set to complete a brief customization setup that allows you to provide the operating system with settings specific to your network and organization.
Under no circumstances should you attempt to boot into Windows Safe Mode or any mode other than the standard the appliance boots into automatically — doing so will interrupt Windows mini-setup, causing it to fail which can only be corrected by returning your appliance to the factory for refresh. If you experience any problems with your new appliance during initial boot, contact LogRhythm Support.
To boot your LogRhythm Appliance the first time:
- After turning on the appliance, Windows will enter mini-setup mode and the Set Up Windows dialog box is displayed.
- Select the appropriate values for each:
- Country or region
- App language
- Keyboard layout
- To continue, click Next.
- Read the license terms and select the option to accept the license terms.
You are prompted to change the Administrator password. Type your new password and confirm your password on the next line.
Record your password somewhere safe. LogRhythm Support is unable to recover your password.
- Click Finish to continue. The appliance locks.
- Press CTRL + ALT + DEL and log in with the new Administrator password.
After logging in, the system will run a final setup script and reboot automatically. - When prompted to login, press CTRL + ALT + DEL and the Authorization Warning appears.
- Click OK to continue and log in as Administrator.
The Server Manager application appears. - To complete any additional configuration tasks on the appliance, click Local Server.
Create a LogRhythm Support Account
The LogRhythm Support site has the most current help documentation, software revisions, patches, and other important information.
To become a registered user, log in to the LogRhythm Support site at https://support.logrhythm.com
- Click Request a New Account.
- Complete the request form.
Your registration confirmation will be emailed to you. If you have not received an email for your account, check your spam folder. Contact support if you still have not received it within a reasonable amount of time.
Proceed with Deployment Setup
For further instructions, see Getting Started: LogRhythm Appliance Software Configuration on the LogRhythm Support site.