
Install the DR Software
Follow the steps in this section to install and configure the Disaster Recovery solution on Secondary and Primary sites.
Configure the Secondary Platform Manager
To run the setup for the Secondary site:
- Extract the DR zip file to a new local directory on the Secondary Platform Manager.
- Browse to the newly extracted DR folder.
- Right-click DR_Setup and click Run as administrator. Enter your local system administrator credentials.
In the first DR Setup dialog, enter credentials for a SQL Sysadmin or select the Windows Authentication check box, and then click Next.
The user entered here MUST have Sysadmin permissions in Microsoft SQL Server Management Studio. To check permissions, open and connect to the MS SQL SMS. In the main tree, expand the Security > Logins folder. Select the user you want or create a new one. Right-click the user and select Properties. Click Server Roles and make sure that the Sysadmin Server role is checked for this user.Select Secondary, and then click Next.
If you accidentally leave this setting at Primary, the DR setup will fail. If this happens, you need to run the DR Setup on the Secondary system again and choose Secondary.- Under Primary, enter the Replica IP address of the Primary site. Make sure the Primary Port number is the same one you selected during the Primary site configuration. Under Secondary, select the Replica IP address for the Secondary site (use the arrow to select from discovered IPs). Make sure the Secondary Port number is the same one you selected during the Primary site configuration. Click Next.
- Select the minutes for the Recovery Point Objective (RPO) on the Secondary Platform Manager. The default is 60 minutes. This value does not need to be the same RPO selected for the Primary Platform Manager.
Click Install.
The DR Setup script will launch and the Windows Failover Clustering feature is installed. If a reboot is required you will be prompted to do so.If your deployment doesn't use Windows Authentication, you may be prompted to reenter SQL credentials following the reboot.
DR Setup continues automatically after logging in, and you will be prompted to stop the LogRhythm Services and to run DR Setup on the Primary node.
Setup continues automatically on this node and you may return to it after all actions have completed on the Primary node.When you see the DR Setup is complete message, press Enter to start LogRhythm services.
You are now done with setup on the Secondary site.Do not start the Platform Manager’s services (Job Manager and ARM) on the Secondary site. The Job Manager and ARM services should remain on “Manual” unless you need to perform a failover to the Secondary site, as described in the LogRhythm Disaster Recovery Administration Guide.
Configure the Primary Platform Manager
To run the setup for the Primary site:
- Download the DR zip file from the LogRhythm Community and extract it to a new local directory on the Primary Platform Manager.
- Browse to the newly extracted DR directory.
- Right-click DR_Setup and select Run as administrator. Enter your local system administrator credentials.
In the first DR Setup dialog, enter credentials for a SQL Sysadmin or enable the Windows Authentication check box, and then click Next.
The user entered here MUST have Sysadmin permissions in Microsoft SQL Server Management Studio. To check permissions, open and connect to the MS SQL SMS. In the main tree, expand the Security > Logins folder. Select the user you want or create a new one. Right-click the user and select Properties. Click Server Roles and make sure that the Sysadmin Server role is checked for this user.- Select Primary, and then click Next.
- Under Primary, select Failover IP and enter the Failover Cluster IP address to use on the Primary.
Under Secondary, select Failover IP and enter the Failover Cluster IP address to use on the Secondary.
Network deployments using single subnets (stretched VLANS, single site installations, etc.) should use the same IP address in the Failover IP fields. Network deployments using multiple subnets should use an IP address in the Failover IP fields in which the cluster node is deployed. These should be two distinct IP addresses.- Under Primary, select the Replication IP address for the Primary site (use the arrow to select from discovered IPs). Under Secondary, select the Replication IP address of the Secondary site. You can select a different port number, if necessary, as long as that port is not used by other systems. The port used for the Primary site and the port used for the Secondary site can be different.
- Click Next.
Select the databases that you want to replicate on the Secondary site, and then click Next.
The EMDB (Platform Manager database) is replicated by default, and the Events and Alarms databases will be selected together.The DR solution does not replicate the LogRhythm Archives.- Select a folder for temporarily storing the database backup, and then click Next.
After you select the folder, the DR Setup shows the Free Space available. If the system does not have enough free space for the backup, an error message appears at the bottom of the dialog. If necessary, you can select a network drive or external drive. If you want to change your database selections, click Back to return to the previous screen. - Select the minutes for your Recovery Point Objective (RPO).
The RPO is the maximum tolerable period in which data from the Primary system can be lost due to system disruption. If the data replication falls behind this time limit, LogRhythm generates an alert. The default is 60 minutes. To back up the Platform Manager databases and to install the DR solution on the Primary system, click Install.
The DR Setup script will launch and the Windows Failover Clustering feature will now be installed. If a reboot is required you will be prompted to do so.If your deployment doesn't use Windows Authentication, you may be prompted to reenter SQL credentials following the reboot.
DR Setup will continue automatically after login and you will be prompted to stop the LogRhythm Services.
The previously selected SQL databases will be backed up and restored to the Secondary.This process may take several hours depending on the size of the database. The backup or restore in progress will be displayed — do not exit this window.- When you see the DR Setup is complete message, press Enter to start LogRhythm Services.
Re-Run the LogRhythm Infrastructure Installer
Run the LogRhythm Install Wizard (Found in C:\Program Files\LogRhythm\LogRhythm Infrastructure Installer\dependencies\deptoolgui\lrii.exe) from the Primary server.
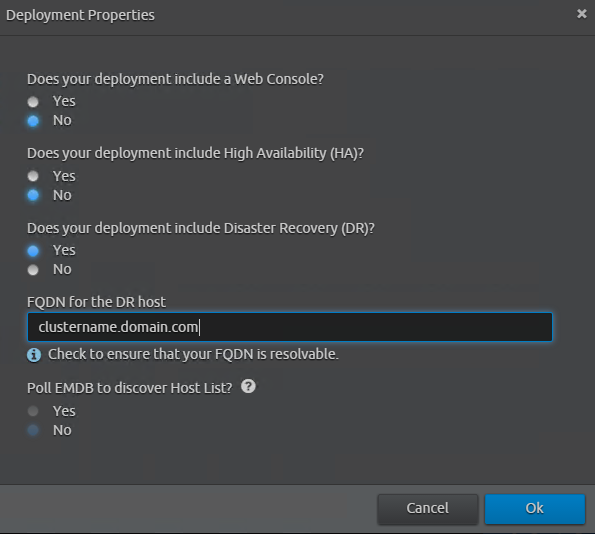
The Deployment Properties modal asks whether your deployment includes Disaster Recovery. Be sure to select Yes and provide the shared FQDN of the DR cluster.
When the deployment tool launches, click the Add/Remove Host option.
- Add the Management IP address of each DR server as two separate hosts in the deployment tool.
- If applicable, add the IP addresses of other participating hosts in your LogRhythm deployment, and then click Create Deployment Package.
- After the deployment package is created, click Run Host Installer on This Host. Leave this window open until the final step of this section.
- Copy the deployment package from step 4—both the Windows executable and the plan file—to a location the secondary host of the DR pair.
- Log in to the Secondary host, run cmd as an administrator, and change the directory to the location where you copied the LRII executable and plan file.
- From the command prompt, run lrii_windows.exe /dr-secondary, and verify that the command finishes without any errors.
- Run the LRII exe from the deployment package on each additional LogRhythm host in the deployment.
- Return to the Primary DR server and select Verify Status to confirm that all LogRhythm Host Installers have completed successfully. Exit when confirmation is complete.
- Through services.msc, verify that the LogRhythm Service Registry service is using the appropriate service account after re-running the Infrastructure Installer.
Considerations for XM Environments
DR is used to replicate SQL data as well as Platform Manager services. In an XM environment, there may be other components on the DR servers that must be accounted for.
- Create a new Data Processor record in the Client Console's Deployment Manager. This Data Processor should be associated with the host record of the server on which it is installed. Licensing for the extra Data Processor can be acquired from the LogRhythm Fulfillment team. For more information, see Modify Data Processor Basic Properties.
The Data Indexer on the secondary DR server should have its own cluster name, and the secondary Data Processor should be configured to use this cluster. For more information, see Configure the Data Indexer.
You can change the cluster name by updating the environmental system variable DX_ES_CLUSTER_NAME and restarting the DX services.- On XM deployments running AIE, an additional AI Engine server must be created using the Client Console's Deployment Manager. This AIE server should be associated with the host record on which it is installed, and it must be added to the global workload. For more information, see Add AI Engine Servers.