Initialize the Generic Beat with Page-Based Pagination, Basic Authentication, and the "Between Start and End Date" Filter
This topic outlines the process to set up the Generic beat to fetch logs from any log sources that support page-based pagination, basic authentication, and the "between start and end date" filter.
This guide assumes a working knowledge of the API request and response format to be set up with the Generic beat.
Prerequisites
- Open Collector is installed. If you have not already installed it, follow the instructions in the Open Collector Installation and User Guide, and then return to this topic.
- Log source Name (The same as the name of the log source you want to setup with the Generic beat).
- Log source URL (The complete URL with which logs can be fetched from the log source).
- Log source Username and Password (for basic authentication).
- Page size field, the field name sent as the page size field in the request.
- Page size value, the numeric value sent to limit the number of records returned by the server in a single request.
- Page number field, the field name sent as the page number field in the request.
- Start date field supported by the API.
- Start date value supported by the API.
- End date field supported by the API.
- End date value supported by the API.
- Time format supported by the API.
- Time range supported by the API.
- Number of back days data supported by the API.
- Sorting fields, if sorting is supported by the API.
- Response data field, if the response needs to be fetched from a specific field in JSON.
- Period during which logs need to be fetched from the log source.
- Request headers and query parameters that the API requires to fetch logs from an endpoint.
The following port is open:
Direction
Port
Protocol
Source
Outbound 443/80 HTTPS/HTTP genericbeat
Initialize the Beat
For more information on any of the Generic beat-specific fields described in this topic, see the Guide to Generic Beat Prompt Inputs section of the Understand the Generic Beat topic.
To confirm the Open Collector is running, run the following command:
./lrctl statusIf the Open Collector is not running correctly, see Troubleshoot the Open Collector in the Open Collector Installation and User Guide.
You should see the open_collector and metrics versions.To start the Beat, run the following command:
./lrctl genericbeat startThe values shown in the images used in this guide are example values. Replace the example values with the actual values that your API supports.
Select New genericbeat instance using the arrow keys. Enter the unique beat identifier for this beat instance, and then press Enter.
- Enter the log source name for the Generic beat's configuration, and then press Enter.
- Select GET as the HTTP request method using the arrow keys, and then press Enter.

- Enter the API URL to be used for the Generic beat's configuration, and then press Enter.
- Select the Page Number Pagination style using the arrow keys, and then press Enter.
- Enter the page size field supported by the API, and then press Enter.
- Enter the page size value supported by the API, and then press Enter.
- Enter the page number field supported by the API, and then press Enter.
- Select the Date Range filter type using the arrow keys, and then press Enter.
- Select one of the date-time formats for the date range filter using the arrow keys, and then press Enter.
- Enter the delay time (in seconds) supported by the API for live logs. For example, 2s.
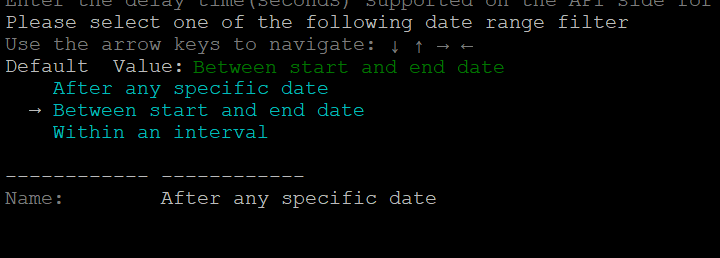
- Select the Between start and end date filter using the arrow keys, and then press Enter.

- Enter the start field, and then press Enter.

- Enter the start value, and then press Enter.
- Enter the end field, and then press Enter.
- Enter the end value, and then press Enter.
- Select the Basic Authentication mechanism using the arrow keys, and then press Enter.
- Enter the Username for basic authentication, and then press Enter.
- Enter the Password for basic authentication, and then press Enter.
- Select whether the API supports sorting using the arrow keys, and then press Enter.
- (Optional) Enter the sorting field, and then press Enter.
- (Optional) Enter the sorting value, and then press Enter.
- Enter the request headers (other than the authentication header) in the “key:value” format, and then press 'c' to continue.
- Enter the request body in the key:value format, and then press 'c' to continue.

- Enter the request parameters (other than start time and end time) in the key:value format, and then press 'c' to continue.
- To parse any specific field from the response (for example, if the API response contains logs in a specific field), select yes using the arrow keys and then press Enter.
- Enter the field in the API response in which data will come (for example, "resp"), and then press Enter.
- Enter the polling period for the beat in seconds (for example, "30s"), and then press Enter.
The beat is successfully initialized using page-based pagination, basic authentication, and the "between start and end date" filter.
