SecondLook is available to LRCloud customers who purchase extended archive storage. This version of SecondLook is managed in the Web Console. LRCloud environment is allotted two new servers when a customer purchases an extended archive. A SecondLook data processor server for running the new SecondLook as a service application and a SecondLook data indexer server for indexing restored logs without affecting the live logs. The size of the server depends on how much archive space the customer has purchased.
SecondLook is a new menu option in the Administration menu.

Once the user selects the SecondLook option in the Administration menu, the SecondLook Administration page appears where the users can see their saved and executed searches.

Role-based Access Control
Only a restricted administrator user can provide the necessary access to SecondLook for custom security profiles that requires access. The “LRCloud User” User Profile was updated during the upgrade to 7.11. If any other custom profiles have been created, they must enable the following option:
This is only available to user profiles using the security role of Restricted Administrator, and not for Restricted Analyst.
A new privilege, Enable SecondLook, has been added in the SecondLook services tab of the Configuration Manager window. This feature can be set to On/Off by the users for the Web Console.
-
Click Deployment Manager from the main toolbar.
-
In the Tools menu, click Administration, and then click User Profile Manager.
The User Profile Manager window appears where the list of existing User Profiles is displayed. -
Select the required user profile and then click Properties.
The User Profile Properties - Allowed window appears. -
Click the Data Processor Access Rights tab and then select the Specified Data Processors checkbox.
-
Select the required profile and right-click to click Actions and then click Grant.
-
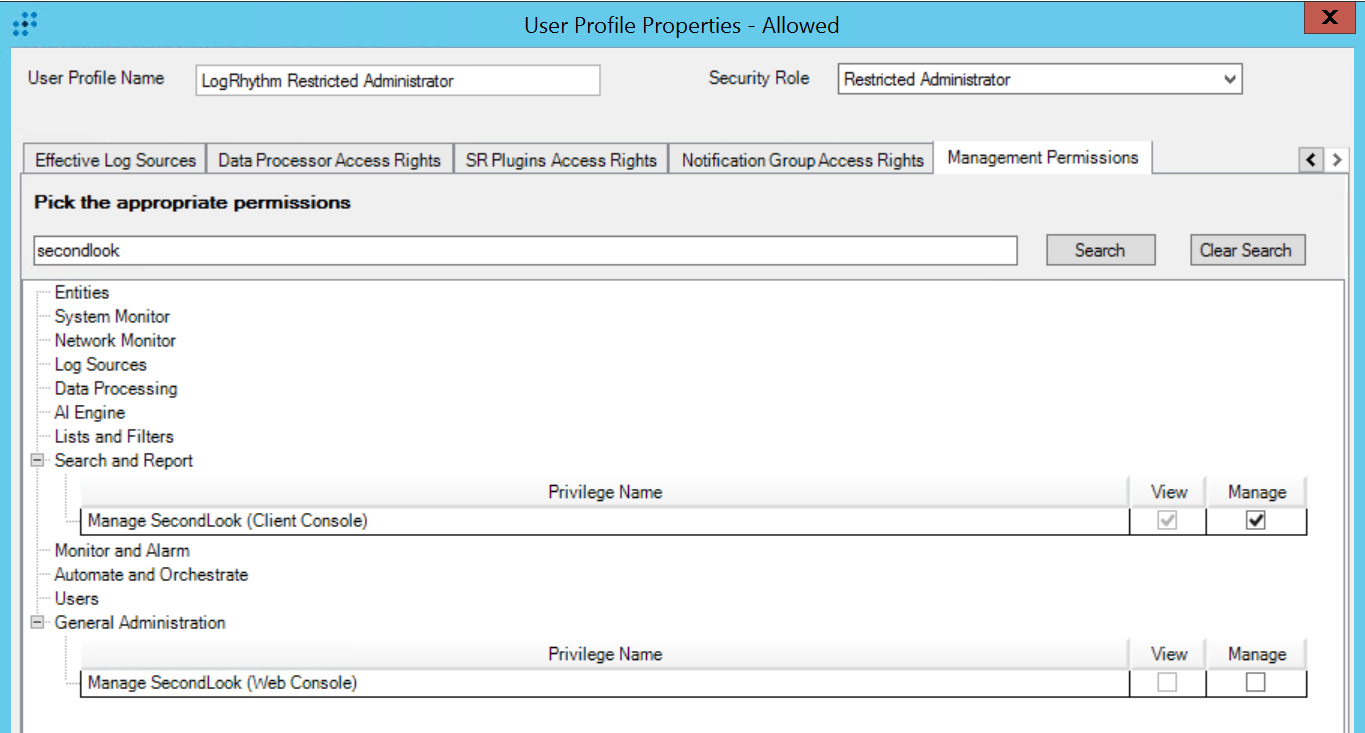
Click the Management Permissions tab and search for Manage SecondLook in the search textbox.
-
Click Search and Report.
The Manage SecondLook (Client Console) privilege appears. -
Enable/disable the View and Manage options.
-
Click General Administration.
The Manage SecondLook (Web Console) privilege appears.This privilege will be available to users who chose to set the Enable SecondLook option On in the Configuration Manager.
-
Enable/disable the View and Manage options.
-
Click Ok.
The User Profile Changes Applied message box appears. -
Click Ok and then click Close.
Saved Searches
In the Saved Searches tab, the following details are available:
-
-
Actions:
-
Play icon: The saved SecondLook searches are run.
-
Edit icon: The SecondLook Query window is opened.
-
Delete icon: The saved SecondLook searches are deleted.
-
-
Name : The names of the saved SecondLook searches are displayed.
-
Description : The description for the corresponding SecondLook search is displayed.
-
Owner Name : The name of the user that created the SecondLook search is displayed.
-
Read Permissions
-
Write Permissions
-
Created
-
Modified
-
The user can filter any required data by entering the information in the row below the column title in all the above-mentioned columns other than the Actions column.
Creating a New SecondLook Search
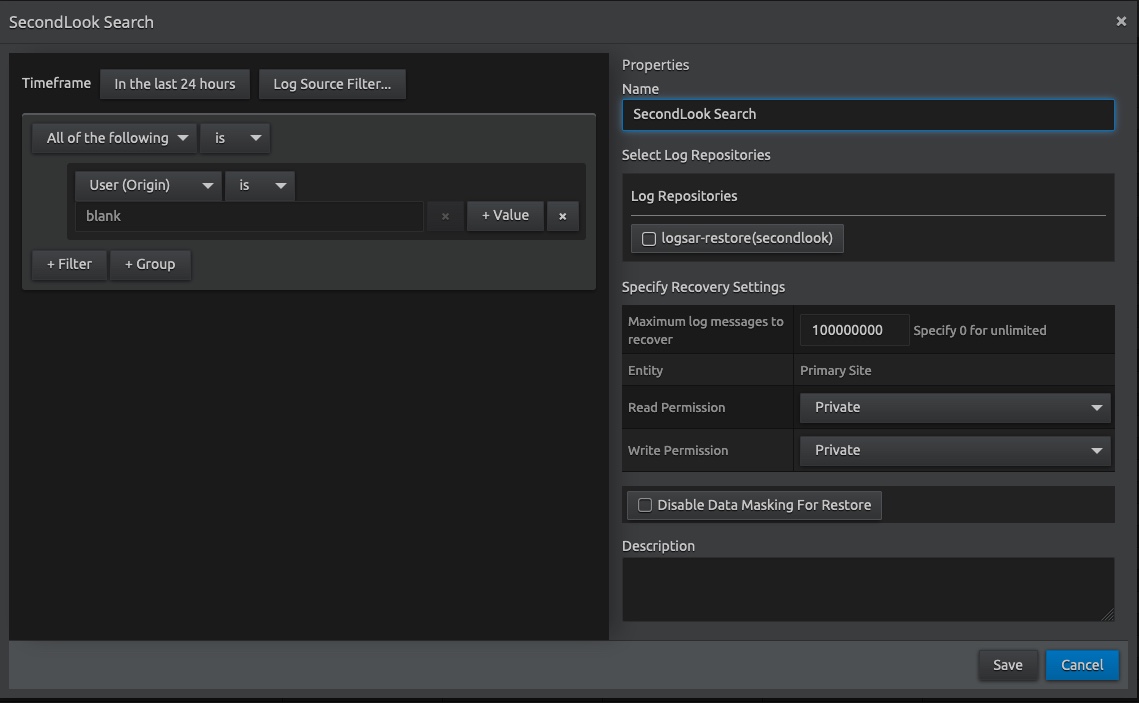
To open the SecondLook Search configuration window, click the New SecondLook search button available at the top of the SecondLook Administration page.
-
Configure the search criteria of the logs that needs to be restored.
-
Users will be able to select their time frame, log source filter, and search filters.
-
More information on the search filters can be found in the Web Console User Guide.
It is important to be as specific as possible in order to reduce the runtime of the SecondLook search.
-
-
Users have the following options in the Properties pane:
-
-
Name : Provide a name for the search to be saved and displayed on the Executed Searches tab. It is not necessary that the name must be unique.
-
Select Log Repositories : Allows users to select the exact repository to which the logs need to be restored.
-
Specify Recovery Settings:
-
Maximum log messages to recover
-
Entity
-
Read Permission
-
Write Permission
-
-
Disable Data Masking for Restore - Personally Identifiable Information (PII), in which information will be masked when restored from the archive file.
-
Description - Enter a description to describe what this search is about.
-
Save
-
Cancel
-
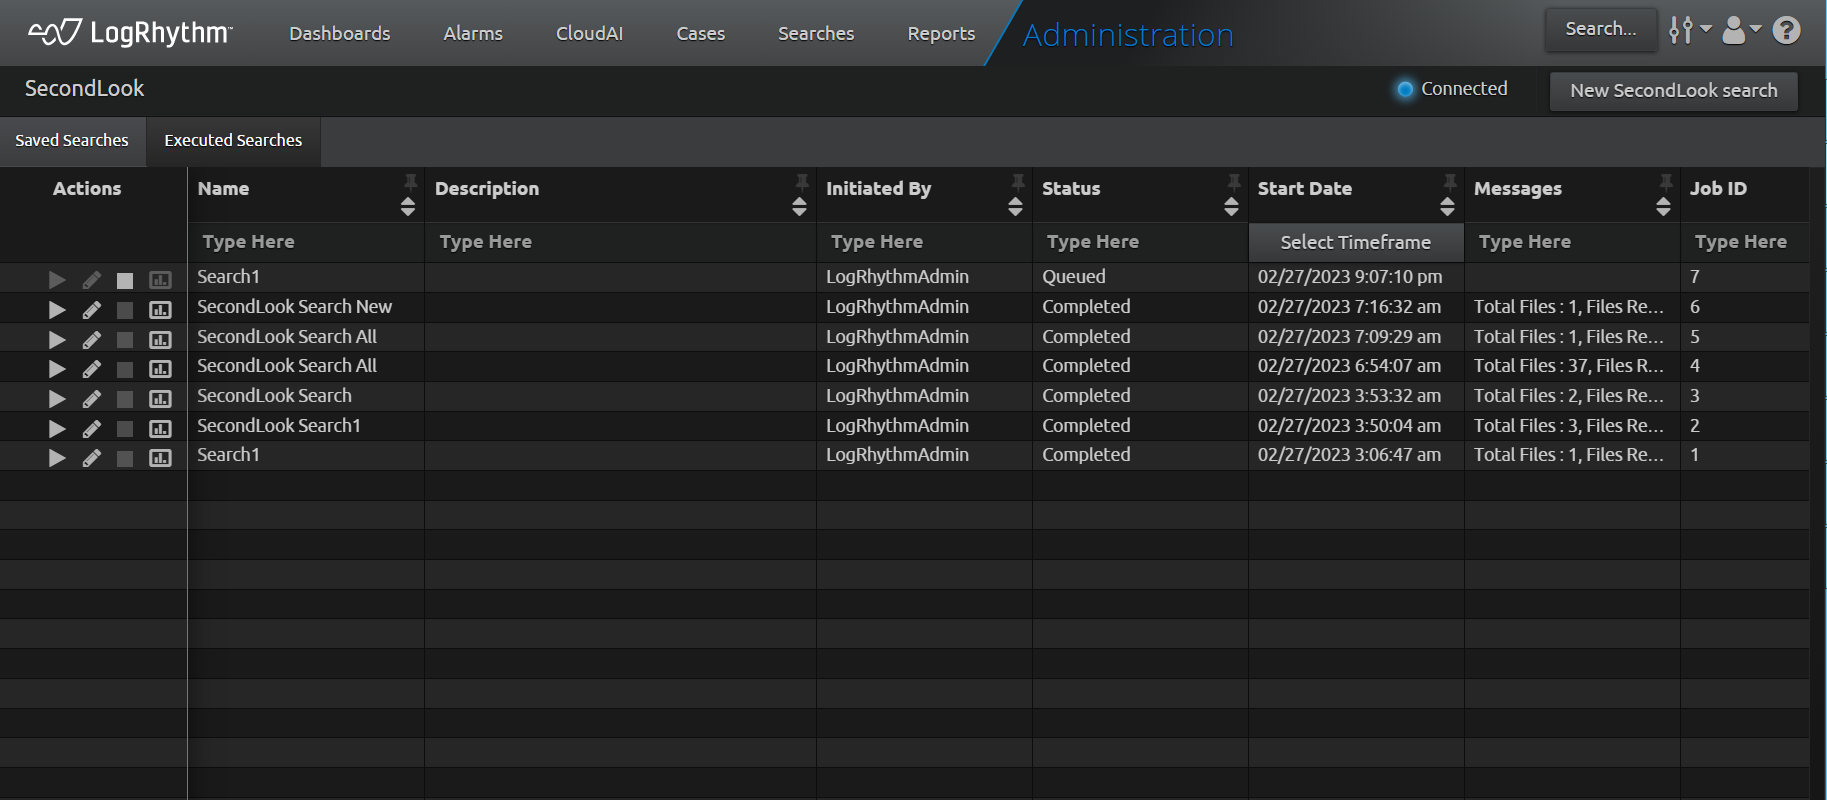
Executed Searches Tab
The following columns, information, and actions are available in the Executed Searches tab:
-
-
-
Actions:
-
Play icon: The previous SecondLook search is run again. Displayed only for failed/completed searches.
-
Edit icon: Opens the SecondLook Query window with the search details and allows the user to edit the details before running again. Displayed only for failed/completed searches.
-
Stop icon: Cancels a running or queued SecondLook search. Displayed only for running or queued SecondLook searches. Updates status to "Canceled" when clicked and stops the query.
-
Quick search icon: This icon is enabled only for completed searches. When a user clicks the quick search icon, a new search is initiated based on the search criteria mentioned in the corresponding saved search and a search card is displayed at the bottom left of the window. The user can click the search card after the search is complete to open the Analyze page in a new tab with all the search results.
-
-
Name : The names of the saved SecondLook searches are displayed.
-
Description : The description for the corresponding SecondLook search is displayed.
-
Initiated By : The name of the user that initiated the SecondLook search is displayed.
-
Status: Shows the progress of the SecondLook search. The available status options are:
-
InProgress
-
Queued
-
Completed
-
Failed
-
InitiatingStop
-
Stopped
-
-
Start Date : Timestamp of when each SecondLook search was launched.
-
Messages : Displays information on the search such as the progress details, error messages, and information on completed searches including the number of logs found and restored.
-
Job ID : The Job ID number of the SecondLook search is displayed.
-
-
Quick Search
A quick search button has been added in the Actions column for all the completed searches in the Executed Searches page of the Web Console.
-
Log in to the Web Console.
-
On the top navigation bar, click the Administration icon, and then click SecondLook.
-
Click the Executed Searches tab.
-
Click the Quick Search icon for the required SecondLook search row.
The quick search icon is only available for completed searches. For searches that are queued, in-progress, or stopped, the quick search icon is disabled.
If the user clicks the quick search icon for any completed search, a search is initiated based on the search criteria mentioned in the corresponding saved search, and a search card is displayed on the bottom left of the page.
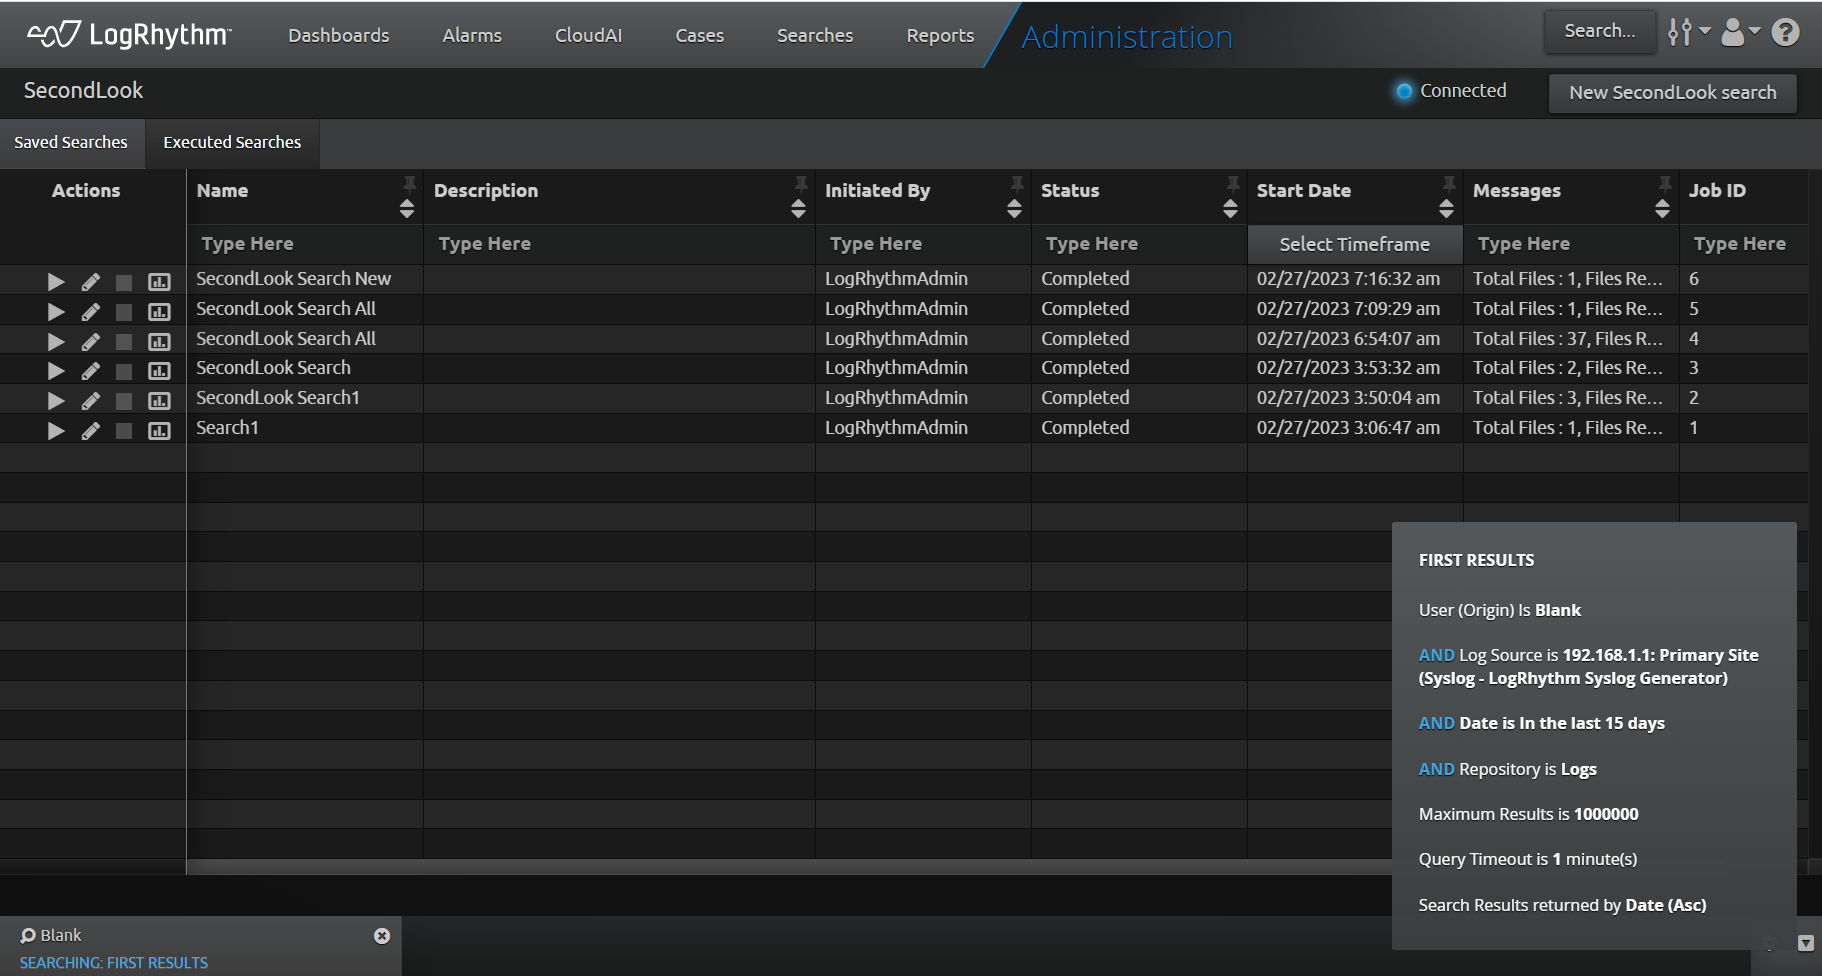
When the search is complete, the user can click on the search card and the Analyze page loads in a new tab with all the search results.
For any completed search, if the corresponding saved search is edited (like timeframe, log repository, or log sources:), then the quick search will return the result using the updated search criteria.
For any completed search, if the corresponding saved search is deleted, then the quick search for that completed SecondLook search will not run and the pop-up message "Cannot initiate quick search since it has been deleted from saved searches" is displayed.
Execute a Saved SecondLook Search
-
In the Saved Searches tab, click the Play icon.
-
Click the Executed Searches tab to view the status of the search.
Only one SecondLook search can be executed at a time. Other searches are queued until the previous search has completed. Once a SecondLook search has completed, the user can do a search against the restored indices to see the restored logs.
Searching for Restored SecondLook Data
-
At the top of the page, click Search, and then click Advanced...
-
Fill in the same data as used in the SecondLook search (for example, the time frame, log source filter, and search filters).
-
Scroll down to Log Repositories and select the off logsar-restore(secondlook) checkbox.

-
Click Search.
A task card appears at the bottom of the page and updates as the search progresses. -
Click on the task to see the results.