Introduction
Welcome and thank you for choosing LogRhythm Cloud! This guide helps you get connected to the Client and Web Consoles. It also provides some best practices for working in the LogRhythm Cloud environment.
Get Connected and Create a LogRhythm Account
Use the credentials and other information provided in the reference sheet you received during onboarding to log in to the Client and Web Consoles.
Log in to the Client Console
The Client Console is an administrative console that can be accessed through Cameyo, an application virtualization product.
-
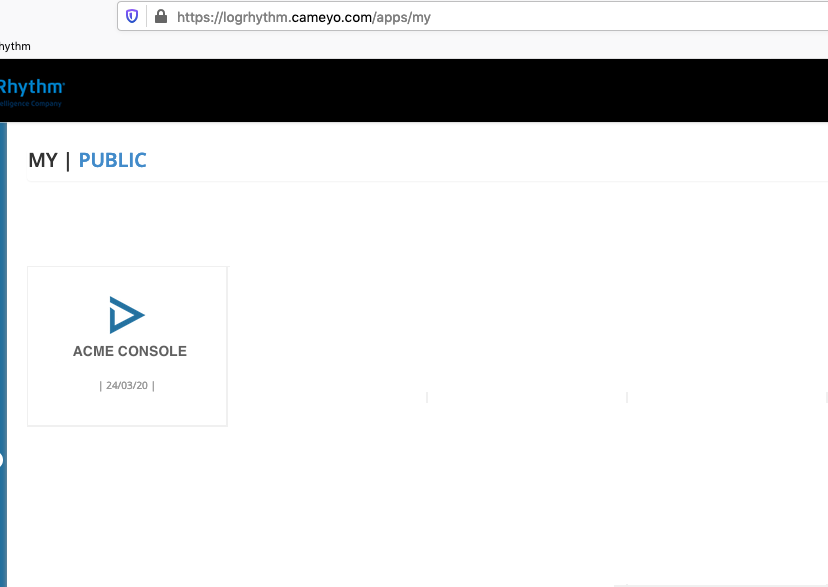
Go to https://logrhythm.cameyo.com.
-
Log in to Cameyo using your O365 or Gmail credentials.
If you are using O356 to log in and receive a "Need Admin Approval" message, see Enable O365 Integrated Applications.
The landing page appears, displaying at least one tile titled "[Organization Name] CONSOLE".
Open a Support Case requesting access, if you do not find at least one tile on the landing page.
-
Click the Client Console tile to launch the Console.
The Client Console is launched in a separate window. -
Enter the following details in the corresponding fields to log in.
-
EMDB Server (xxxxx-pm.logrhythm.cloud)
-
User ID
-
Password
The Blacknote link, provided in the onboarding material, has the password for the default account which is one-time use and will no longer be available once accessed.
-
-
Click OK.
How to close a Cameyo session: To exit from the LogRhythm Client Console, click File and then click Exit within the Client Console or click the Close icon at the top-right corner of the Console. This initiates a proper shutdown of the Cameyo session. It is not advised to directly close the browser tabs or the application window.
Create Your LogRhythm Account
Once you are logged in with the default credentials, create a person record for your LogRhythm account. Repeat the following procedure to create multiple user accounts in an organization.
This does not grant users access to the console tile in Cameyo. A
Support Case
needs to be created if additional users require access. A customer is provided with a limited number of Cameyo licenses and only the administrator has access.
If you are working with LogRhythm Professional Services or a Managed Service Provider, see the respective sections for additional information.
-
In the Client Console, click Deployment Manager from the toolbar.
-
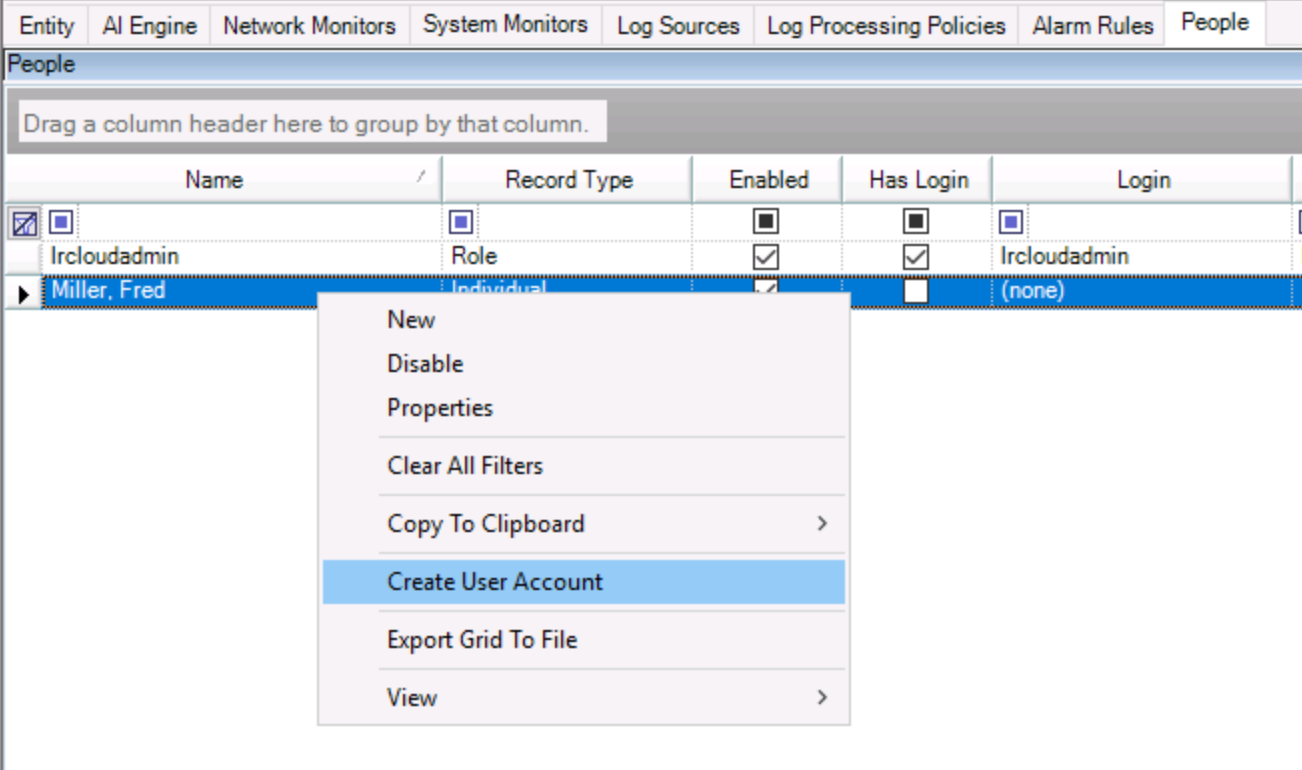
Click the People tab.
The People grid appears. -
Right-click the grid and then click New.
-
Click Yes in the prompt that appears.
The Person Properties (Individual) dialog box appears. -
Enter your first name and last name in the respective fields.
-
Click the Permissions tab.
-
In the Read Access menu, select Public Restricted Admin.
-
In the Write Access menu, select Public Restricted Admin.
-
Click OK.
A new person record is created which can be accessed in the People grid.
Create Your User Account
-
Right-click the new person record created and click Create User Account.
The Add LogRhythm User dialog box appears.
-
In the User Info section, do the following:
-
Enter a username in the User Login field.
-
In the User Profile menu, select LRCloud User.
-
In the Default Entity menu, select Primary Site.
-
Enter a password in the Password field.
-
Enter the same password in the Verify Password field.
In the Account Options section, both the Login Enabled and Enforce Password Policy checkboxes are selected by default.
-
-
Click OK.
You can now use this new account to log in to both the Client and Web Consoles.
Log in to the Web Console
The Web Console provides easy access to analyst tools and can be viewed in a web browser.
There are no limitations to the number of users who can have access to the Web Console.
-
Go to https://[OrgName].logrhythm.cloud.
-
Enter your username and password in the sign in window.
The credentials created in the Get Started with LogRhythm Cloud | id (2023.10)GetStartedwithLogRhythmCloud CreateYourUserAccount section must be used to log in. -
Click Sign in.
-
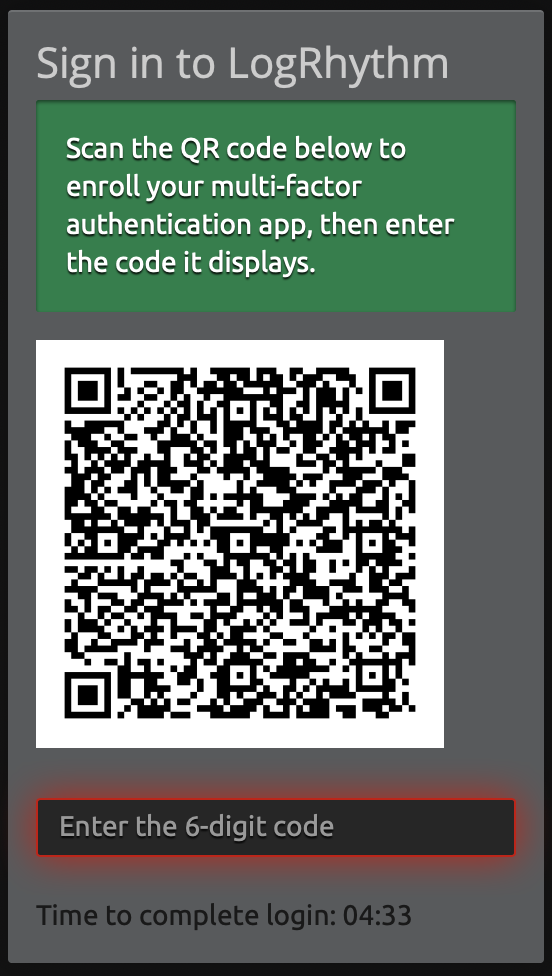
Configure Multi-factor Authentication (MFA).
An internal MFA application, such as Okta, can be used. You can also configure a browser plugin, such as Google Authenticator.
-
Enter the 6-digit two-factor authentication code from the MFA application.
-
Click Sign in.
Enable O365 Integrated Applications
The Integrated Applications feature is disabled by default in Office 365 and only enterprise administrators are authorized to enable it. While logging into Cameyo, if you receive a message that indicates Cameyo needs permission to access O365 resources, contact your O365 administrator for access. For more information on Integrated Applications, see Microsoft's Office 365 Documentation.
To enable Integrated Applications in the Office 365 Admin center, do the following:
-
Log in to Office.com as an enterprise administrator.
-
Navigate to the Admin Center.
-
In the Settings panel, select Services & add-ins.
-
Enable the Integrated Applications by turning the switch to ON.
-
Click Save.
File Exports and Imports
Cameyo allows users with access to the Client Console to upload or download files from and to the Client Console, if necessary.
Export Files
In the Client Console, you can find options to export and save content in every window. To export and download the file directly to your browser's download folder, do the following:
-
Follow the procedure to generate a file that you need to download from the Client Console.
The Save As dialog box appears. -
Navigate to This PC in the left pane.
-
Select the “Storage on $XXXXXXXXXXX” drive.
-
Select the Download folder as your destination to save the file.
-
Click Save.
The file is downloaded directly to your browser and is saved in your computer.
Import Files
To upload and import files to the Client Console, do the following:
-
Drag and drop the file you want to import onto the Cameyo window in your web browser.
A small window appears in the bottom-right corner of the browser window which indicates the transfer progress. -
Follow the procedure to import and upload a file in the Client Console.
-
Click File and then click Open.
The Open dialog box appears. -
Navigate to This PC in the left pane.
-
Select the "Storage on $XXXXXXXXXXX” drive.
-
Select the file to be uploaded and click Open.
The files that can be uploaded appear in this folder. If there are no files available, press F5 to refresh the window.
Smart Response Plugin and System Monitor Update Package Imports
Some parts of the Client Console software, such as Smart Response Plugins and System Monitor Update Packages, require files to be local to the machine and copied from the "Storage on $XXXXXXXXXXX" directory.
Start Using LogRhythm
You can start feeding data into the system as soon as you are able to access LogRhythm. Initially, you must deploy System Monitors and set up the log sources that needs to be collected. Once you have data flowing into the SIEM, you can manage the LogRhythm suite.
The following articles and resources can be used as reference, if necessary.
System Monitor Overview
-
Agent functionality
-
Installation process
-
Configuration
-
Upgrades
Log Sources Overview
-
Add and retire log sources
-
Log source collection guides
-
Custom log source information
LogRhythm Community
-
Documentation and downloads
-
LogRhythm University
-
Community forums
Network Communications
The network communications and interactions between the customer and LogRhythm Cloud environments is depicted in this section.
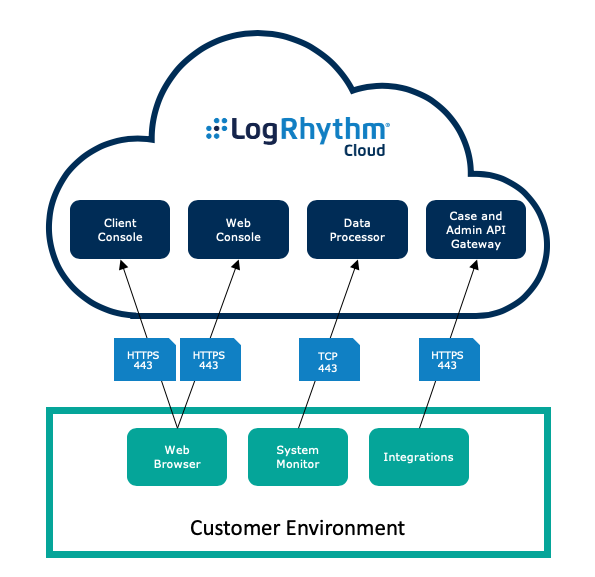
Component Interaction
|
Client |
Client Port |
Server |
Server DNS Address |
Server Port |
Protocol |
Communications |
|---|---|---|---|---|---|---|
|
Web Browser |
Random |
LogRhythm Web Console |
https://[OrgName].logrhythm.cloud* |
443 |
HTTPS |
Bidirectional, Client Initiated |
|
Web Browser |
Random |
LogRhythm Client Console |
443 |
HTTPS |
Bidirectional, Client Initiated |
|
|
System Monitor |
Random |
Data Processor |
[OrgName]-dp.logrhythm.cloud* |
443 |
TCP/TLS |
Bidirectional, Client Initiated |
|
Integrations |
Random |
API Gateway |
[OrgName]-api.logrhythm.cloud* |
443 |
HTTPS |
Bidirectional, Client Initiated |
*Specific DNS names are provided in the reference sheet.
Professional Services
If you are working with LogRhythm Professional Services, you should provide your consultant direct access to the LogRhythm Cloud environment. To create a new user account, see Creating Your LogRhythm User Account. You should also open a Support Case to request access to the console tile in Cameyo for your consultant.
Managed Service Provider
If you are working with one of LogRhythm's partners or a Managed Service Provider, you need to provide them direct access to the LogRhythm Cloud environment. Follow the procedure in Creating Your LogRhythm User Account to create LogRhythm accounts. You should open a Support Case to request access to the console tile in Cameyo for additional users.
The Managed Service Provider that you are working with will need an O365 or Gmail account to access Cameyo.
Open a Support Case
A support case must be opened through the Support Portal (http://support.logrhythm.com) for any requests or issues. If you are not a registered user, you can register in the Support Portal by selecting the "Not a Member?" option.