Upgrade Appliances in an HA Deployment
Update Windows Appliances
Use the LogRhythm Install Wizard to install or upgrade LogRhythm components in your deployment. You must run the Install Wizard on each appliance or server in your deployment, and select the appliance configuration that you want to install or upgrade.
- The LogRhythm Install Wizard requires .NET Framework version 4.7.2 or above.
- If you are installing or upgrading the Data Indexer or Web Console, ensure that Windows Firewall Service is running before starting the Install Wizard to allow firewall rules to be created.
- Do not try to run the wizard from a network share. Run the wizard locally on each appliance.
- For systems with UAC (Vista and later), always run installers as a Local Administrator with elevated privileges. The person performing the installation must be in the Local Admin group, unless the domain is managed and the Group Policy Object dictates that only Domain Administrators can run installers.
- When installing the Web Console, it is recommended that you run the LogRhythm Install Wizard to install all Web Console services. You may choose to install the Web Console as a stand-alone installation or as part of the XM Appliance or Platform Manager (PM) configurations.
- Before installing or upgrading the Web Console, ensure that Windows Firewall is running so the Common installer can open port 8300.
- Log in as an administrator on the appliance or server where you are installing or upgrading LogRhythm software.
- Copy the entire LogRhythm Install Wizard directory to a new directory on the local server.
- Open the Install Wizard directory, right-click LogRhythmInstallWizard.exe, and then click Run as administrator.
The Welcome screen appears. - Click Next to proceed.
The wizard asks you to confirm that you have prepared the LogRhythm databases for the upgrade. - Click one of the following:
- If you have run the Database Install or Upgrade Tool on each Platform Manager or XM server, click Yes to continue.
- If you have not prepared the LogRhythm databases on all required appliances, click No to cancel the wizard, install or upgrade all of the required databases, and then continue with this procedure.
- Read the agreement carefully. By accepting the terms in the agreement, you agree to be bound by those terms.
If you accept the terms of the agreement, select the I accept the terms in the license agreement check box, and then click Next.
The configuration selector appears. Depending on the selected configuration, the wizard upgrades or installs a specific application or set of applications.For certain configurations, you can optionally select to install or upgrade the AI Engine.If you select the Web Console, it is installed to the default location, C:\Program Files\LogRhythm\LogRhythm Web Services. For instructions on how to install the Web Console to a custom location, see Use the LogRhythm Configuration Manager.For each appliance that you install, select the target appliance configuration, according to the following table.
If you are upgrading an existing PM + DP appliance or another configuration that is not represented in the Install Wizard, select one of the available configurations and then run the wizard again to install the next configuration.
7.x.x Configuration Select… XM XM
Platform Manager PM Data Processor DP Client Console Client Console Web Console Web Console AI Engine AIE Data Collector/System Monitor DC LogRhythm Diagnostics Tool LRD Tool LogRhythm Diagnostics Tools Agent LRD Agent If you are running the Install Wizard on an XM or DP/DX appliance, ensure that the Elasticsearch service is running before you continue. You can start all services by running the following command in an Administrative PowerShell prompt: Start-Service lr-*
If this service is not running, the Data Indexer installer will fail. After ensuring the service is running, you can run the Install Wizard again, or run the LRDataIndexer executable in the wizard's Installers subfolder by right-clicking it, and then clicking Run as Administrator.
When you have selected the target configuration, click Install.
The LogRhythm Deployment Tool appears.Select from the following options, depending on the type of deployment you are running:
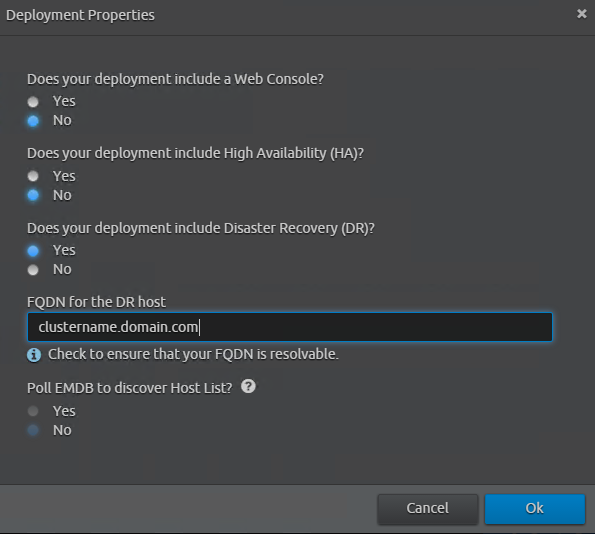
For Disaster Recovery upgrades, follow the procedure for a multi-host upgrade in the LogRhythm Infrastructure Installer. The Deployment Properties modal asks whether your deployment includes Disaster Recovery. Be sure to select Yes and provide the FQDN of the DR Cluster and select OK.
Add the Management IP address of each DR server as two separate hosts in the deployment tool.
If applicable, add the IP addresses of other participating hosts in your LogRhythm deployment, and then click Create Deployment Package.
After the deployment package is created, click Run Host Installer on This Host. Leave this window open until the final step of this section.
Copy the deployment package from previous steps—both the Windows executable and the plan file—to a location the secondary host of the DR pair.
Log in to the Secondary host, run cmd as an administrator, and change the directory to the location where you copied the LRII executable and plan file.
From the command prompt, run lrii_windows.exe /dr-secondary, and verify that the command finishes without any errors.
Run the LRII exe from the deployment package on each additional LogRhythm host in the deployment.
Return to the Primary DR server and select Verify Status to confirm that all LogRhythm Host Installers have completed successfully. Exit when confirmation is complete.
Through services.msc, verify that the LogRhythm Service Registry service is using the appropriate service account after re-running the Infrastructure Installer.
For High Availability upgrades, the following instructions apply.
Select Upgrade Deployment.
The HA shared IP should be supplied as the IP address representing both nodes in the HA cluster. Do not add other IP addresses from the HA nodes.
If applicable, add the IP addresses of other participating hosts in your LogRhythm deployment, and then click Create Deployment Package.
- On the primary node, select Run Host Installer on This Host.
Copy the resulting deployment package (executable and plan file) to a location on the secondary node in the HA cluster.
On the secondary node, open an elevated command prompt (Run as administrator) and change directory to the location of the LRII_Windows.exe copied in the previous step. For example: cd "C:\Users\Administrator\Desktop\Deployment Package"
Run the following command: ".\LRII_Windows.exe --ha-secondary=<shared IP address>" and press Enter.
Additional help is available by clicking the question mark icon in the upper-right of the tool.
When you are finished preparing your deployment, you will be returned to the Install Wizard.Observe for any failures as the wizard installs or upgrades the applications according to the selected configurations.
When the Client Console is installed on a fresh system, additional software packages must be installed such as Microsoft Visual C++ Redistributable packages, SAP Crystal Reports runtime engine, and .NET Framework 4.7.2. For this reason, the Client Console installer may take 30 minutes or more to complete.Progress in the installation screen is indicated as follows:
Color Meaning Green The application was installed successfully. A message about the application and installed version is also printed below the status indicators.
Blue The application is being installed. Yellow The current or a newer version of the application is already installed. Red Something went wrong and the application was not installed. Additional details will be printed below the status indicators. If something went wrong, check the installer logs located in the following location:
C:\LogRhythm\Installer Logs\<install date and time>\During the Web Console installation or upgrade, if you receive a message that notifies you of an error with your Windows Installer package, go into each folder in C:\Program Files\LogRhythm\LogRhythm Web Services and run the unzip.bat file as an administrator. For other failures, run a Repair.Configure your deployment using the LogRhythm Configuration Manager that appears after the installation or upgrade is complete.
The LogRhythm Configuration Manager has two modes: Basic and Advanced. The most commonly edited settings are shown in Basic mode. Advanced mode displays all settings, including those shown in Basic mode, grouped according to which service they affect. You can filter the settings that are displayed by clicking one of the options on the left — All (no filtering), Authentication, or Web Services. When settings are filtered, you should enable the Advanced view to ensure you can see all settings. For more information, see Use the LogRhythm Configuration Manager.
While the Configuration Manager is still open, review your previous Web Console configuration values (backed up before starting the upgrade), turn on the advanced view, and validate or set all of the values in the Configuration Manager, especially the following:- Global, Database Server. This is the IP address of your Platform Manager where the EMDB is installed.
- Web Global, Database Password. This is the password for the LogRhythmWebUI user, used by the Admin API for connecting to the EMDB. If the password is not correct, the Admin API will display an error.
- Web Console UI values. Verify all settings for all Web Console instances.
When finished, click Save, back up your current configuration to file, and then close the Configuration Manager.
After you validate and save your configuration, it is strongly recommended that you make a new back up. Save the file in a safe location in case you need to restore it later.To close the LogRhythm Install Wizard, click Exit.
Run the Install Wizard on the secondary node. When the LogRhythm Deployment Tool (LRII) launches, click Exit and allow the installation to complete.
Run the Post-Upgrade Script
- On each node, browse to the previously unzipped HA Upgrade 7.x subdirectory.
- Right-click the PostUpgrade.ps1 file, and then click Run with PowerShell.
- When the script completes on the primary node, run the post-upgrade script on the secondary node.
- When the script complete on the secondary node, continue to the next section.
Use the LogRhythm Configuration Manager
If you are using multiple Web Console instances, the Configuration Manager lets you apply individual configurations to each instance. Each instance, for single or multiple Web Consoles, will be identified in the Configuration Manager as Web Console UI - HOSTNAME, where HOSTNAME is the Windows host name of the server where the Web Console is installed.
Configuring the Data Indexer for Windows and Linux has moved from the individual clusters to the Configuration Manager on the Platform Manager.
Each Cluster has it’s own section under Data Indexers that looks like this:
Data Indexer - Cluster Name: <ClusterName> Cluster Id: <ClusterID>
The Cluster Name and Cluster ID come from the Environment variables, DX_ES_CLUSTER_NAME and DXCLUSTERID on each server. The Cluster Name can be modified in the Configuration Manager. If you change the Cluster Name, the name should be less than 50 characters long to ensure it displays properly in drop-down menus. The DXCLUSTERID is automatically set by the software and should not be modified.
The LogRhythm Configuration Manager has two modes: Basic and Advanced. The most commonly edited settings are shown in Basic mode. Advanced mode displays all settings, including those shown in Basic mode, grouped according to which service they affect. You can filter the settings that are displayed by clicking one of the options on the left — All (no filtering), Authentication, or Web Services. When settings are filtered, you should enable the Advanced view to ensure you can see all settings.
To expand the screen and see all options at once, click the View menu in the upper-left corner of the LogRhythm Configuration Manager window, then click Toggle Full Screen.
At the bottom of the LogRhythm Configuration Manager window, a service status indicator shows which Services are active or inactive. A blue light indicates that all services are up. A red light indicates that one or more services are down. You can hover the mouse over the indicator to see a list of which services are down. In Advanced mode, the indicator light also appears next to each group header.
To configure settings in the LogRhythm Configuration Manager:
- Find the setting you want to configure by doing one of the following:
- In the Search box, type a term that appears in either the name or description of the configuration. Note that headers and user input data won't be searched. Search returns results from both Basic and Advanced modes, even if Advanced is not toggled on.
- Scroll through the Basic or Advanced configuration mode until you find the option you want. The Configuration Manager is used to configure settings such as user ID, password, authentication strategy, and log level for the following components:
- LogRhythm Database
- Admin API
- AIE Drilldown Cache API
- Alarm API
- API Gateway
- Authentication API
- Case API
- CloudAI
- Data Indexer - (one section per cluster)
- Help and Documentation
- Search API
- Notification Service
- SQL Service
- Web Console API
- Web Console UI
- Web Indexer
- Web Services Host SPI
- Windows Authentication Service
- Enter the configuration you want. Note the following features:
- The LogRhythm Configuration Manager provides informational text as appropriate about what the settings do and what unit data must be entered in.
- Configuration changes that could affect the performance of the environment include a written warning beneath the input box.
- For organizations using Smart Cards, the Automatic Logout Time setting for Web Console API should be increased from the default of zero.
- Upgrading to a new SIEM version may cause the LogRhythmWebUI Database Password to reset to the default password in the Alarm API section in the Configuration Manager. If you had previously changed this password, you must reenter your LogRhythmWebUI Database Password in the Alarm API section in the Configuration Manager.
- When Web Console Smart Card Authorization is enabled, the other Authentication API settings will become unavailable.
- Multi-factor authentication requires users to set up authentication tools on their devices.
Click Save after making changes to the configuration. You can also click Save in the Edit menu in the upper-left corner of the Configuration Manager. The configuration file is saved to %APPDATA%\LogRhythm Configuration Manager\presets. You can make additional configuration backups. For more information, see Back Up and Restore section below.
If you make a configuration change and then change that configuration again back to the previously saved setting, the Save button will be deactivated and the last saved values persist. To undo a single configuration change, click Edit in the upper-left corner of the LogRhythm Configuration Manager, and then click Undo. You can also press Ctrl+Z. If you need to undo several configuration changes at once, clicking the Revert Unsaved Changes button sets all configurations back to their last saved values.
The affected service or services restart automatically and the changes are applied. A restart time of up to 60 seconds is normal.
Import the License File
This section describes how to import a license file and run the licensing wizard for each Data Processor in your deployment to ensure that the correct license has been assigned.
You must import a new license file and perform steps 5-7 on each Data Processor in your deployment.
For more information about licensing or the licensing wizard, see Assign LogRhythm Licenses.
- Copy your LogRhythm SIEM license file to the Platform Manager or to a network location that is accessible from the Platform Manager.
- Log on to a system where the current version of the LogRhythm Client Console is installed.
- Import the LogRhythm SIEM license file:
- Start the Client Console and click Deployment Manager.
- On the File menu, click Import License File.
- Browse to and select your current-version LogRhythm SIEM license file, and then click Open.
The License Import Warning is displayed: Importing a license synchronizes your licenses with the licenses in the file. It is important that you only import the latest license file issued you by LogRhythm. Importing an older license or one with a different master license ID may cause undesired results such as existing licensed components becoming unlicensed. Are you sure the selected file is your latest? - Click Yes to continue importing the file.
- When the import is complete, click OK to close the Import Successful dialog box.
- Click the Data Processors tab.
- Double-click one of the Data Processors in the list.
The Data Processor Properties dialog box appears. Select a cluster from the Cluster Name list, and then click OK.
Cluster information is sent out when applying configuration changes on the Data Indexer. For more information, see Configure the Data Indexer.
- Review the current License Status and run the licensing wizard if necessary, and then click OK.
- Repeat steps 5-7 on each Data Processor in your deployment.