
Message Interpreter
The first line in the Message Interpreter indicates the overall message format Axon used to parse the sample log message into field names and the corresponding values. The Message Interpreter also recognizes child relationships and arrays within the raw log message and organizes the data accordingly. Axon typically parses the sample log message into one of the following overall message formats:
- CEF (Common Events Format)
- DSV (Delimited Separated Value)
- JSON
- Key Value (KV)
- SYSLOG
- XML
The Message Interpreter panel displays your sample message in a parsed format based on the log format Axon has identified. The table shows the following information for the parsed log:
| Column | Description |
|---|---|
ID | A number in the row indicates an identification rule was created from the value in the row. The same number appears next to the corresponding rule in the Identification Rules table. If there are no identification rules for the policy, the ID column displays no numbers. If multiple rules are created from the same value, the additional rules get the same number in the Identification Rules table. Axon also adds a badge count to the number in the Message Interpreter row to show how many rules are assigned to that value. |
| Norm | A number in the row indicates a normalization rule was created from the value in the row. The same number appears next to the corresponding rule in the Normalization Rules table. If there are no normalization rules for the policy, the Norm column displays no numbers. If multiple rules are created from the same value, the additional rules get the same number in the Normalization Rules table. Axon also adds a badge count to the number in the Message Interpreter row to show how many rules are assigned to that value. |
| Name | The field name Axon assigned to the parsed field. |
| Value | The value associated with the field name. When creating rules, the value shown in a row is exactly what is used to create the rule. Rows without a value show the organizing framework Axon used to parse the log message. |
Available Actions in the Message Interpreter
| What do you want to do? | How do you do it? |
|---|---|
Change the overall message format. | In the first row of the table, click the three-dot menu, and then click Edit Text Processor. |
Change the way the overall message is parsed. For more information, see Sequence Editor. | In the first row of the table, click the three-dot menu, and then click Use Sequence. |
Use a value to create an identification rule. For more information, see Create an Identification Rule. | In the value's row, click the three-dot menu, and then click Add to Identification Rules. |
Use a value to create a normalization rule. For more information, see Create a Normalization Rule. | In the value's row, click the three-dot menu, and then click Add to Normalization Rules. |
Use a value to create a common event rule. For more information, see Create a Common Event Rule. | In the value's row, click the three-dot menu, and then click Add to Common Event Rules. |
Apply a text processor to a section. For more information, see Text Processors. | In the first row of the section, click the three-dot menu, and then click Add Text Processor. |
Apply a sequence to a section. For more information, see Sequence Editor. | In the first row of the section, click the three-dot menu, and then click Add Sequence. |
Define the predicate for an array of key value pairs. For more information, see Define a Predicate. | In the row with the first Key, click the three-dot menu, and then click Define Predicate. |
Create an Identification Rule
In the row with the value you want to use, click the three-dot menu, and then click Add to Identification Rules.
The rule appears in the Identification Rules tab in the top right panel. The following information is displayed:Delete Rule ID Number Operator Menu Value Click X to delete the rule. This ID number also appears in the ID column next to the row with the value you used to make the rule. Select Equals or Exists The value you used from the Message Interpreter. In the bottom right panel, the Identification Rules section shows the Match/No Match indicator.
Create a Normalization Rule
In the row with the value you want to use, click the three-dot menu, and then click Add to Normalization Rules.
The rule appears in the Normalization Rules tab in the top right panel. The following information is displayed:Delete Rule Norm Number Operator Select Database Field Click X to delete the rule. This ID number also appears in the ID column next to the row with the value you used to make the rule. Maps to This menu includes the list of available Axon Data Schema fields.
For more information, see Axon Data Schema Guide.
Create a Common Event Rule
In the row with the value you want to use, click the three-dot menu, and then click Add to Common Event Rules.
The rule appears in the Common Event Rules tab in the top right panel. The following sections are displayed:Section Description General Assignment Open the Select Common Events drop-list and choose one of the listed common event rules to associate with this policy. All log messages matching the policy are assigned to the selected common event. Conditional Assignment This section allows you to create if/then statements using operators and the value selected from the Message Interpreter section to determine when additional common events should be associated with log messages.
Whenever the statement you create is True, the selected additional common event is applied to the log message.
(Optional.) If multiple values are assigned to common event rules, additional options are available:
Option Description Checkbox Check the boxes in the if/then headers of multiple conditional rules if the common event assignment of all selected values should be tied together.
Once one or more boxes have been checked, the Actions drop-list appears (see below).
Actions Open the Actions drop-list and select any of the following options to further customize the common event conditional assignments for multiple values.
These options are also available in the vertical three-dot menu next to the checkbox of each conditional rule.
Combine Rule Blocks Select this option to combine each checked rule block into a single rule block. This gives you the option to assign a conditional common event when more than one condition has been met.
This option also adds the Or/And drop-list. Select OR to trigger the conditional common event assignment if any one of the conditional statements is met. Select AND to trigger the conditional common event assignment only if all of the conditional statements are met.
Separate Rule Blocks Select this option to separate any checked combined rule block back into its individual rule blocks. Delete Select this option to delete any checked rule blocks.
Define a Predicate
Array predicates usually occur JSON messages that contain an array of key value pairs within them. When this happens, instead of parsing the key as a field name Axon parses both the key and value into the value column. In these cases, you need to define the key as the array predicate so the key will be recognized as the field name associated with its value pair.
To define a predicate:
- In the first row of the array, click the three-dot menu, and then click Define Predicate.
A message box appears with the following message:
Use <Key> as the predicate for this element or entire array of elements? - To define the predicate for just one element, click This element.
- To define the predicate for all elements in the array, click Entire array of elements.
For example, with the following log message format:
{"Key Values":[{"Key":"username","value":"user1"},{"Key":"host","value":"workstation1"}]}Axon parses the format:
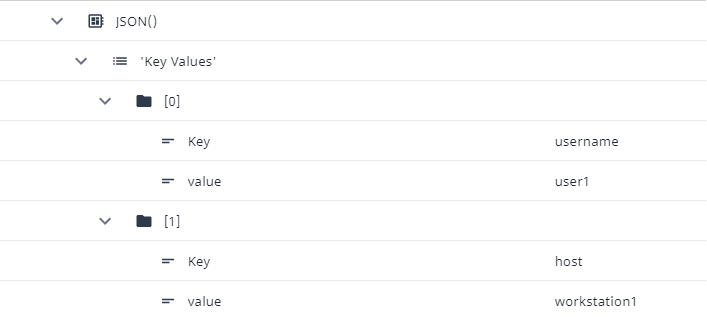
Where "username" and "user1" are both considered values, and "host" and "workstation1" are both considered values. You want "username" and "host" to be field names, so you need to define a predicate. Since the array has two elements, you define the predicate for the entire array.
- Click the three-dot menu in the row with "username," and then click Define Predicate.
- Click Entire array of elements, to define both "username" and "host" as field names.