
Use Search
Search allows you to query data from your default Data Processors. If you have not set a default Data Processor, then the search queries all available Data Processors.
To use Search:
From the top right of the Web Console, click Search.
The Search dialog box appears.The recent searches list included at the bottom of the Search dialog box allows you to re-run a previous search without having to build it again. Click the Run icon next to a search to rerun it. You can also edit your recent searches by clicking the Edit icon next to the search you want. For more information on editing searches, see Manage the Searches Page.
If at any time you want to remove all the search filters that have been applied so you can begin building a new search, click Reset.
(Optional) To see real-time logs or events that match your query, toggle the Tail option.
- Do one of the following:
Timeframe (Not using tail). Click in the last [xx hours/days] as needed to set a time frame for your search results. Point to a date to see which dates have hot, warm, or no data. The default search time frame is in the last 24 hours.
Duration (Using tail). Select the number of minutes you want the tail to run. The maximum is 15.
- (Optional) Apply a Log Source Filter.
- Click Log Source Filter.
- In the Log Source Filter dialog box, do any of the following:
- From the Select Sources lists, apply any of the following filters as needed to target the log source(s) that you are looking for:
- Entity
- Host
- Type
- Status
- Lists and Log Sources
- From the Select Sources lists, apply any of the following filters as needed to target the log source(s) that you are looking for:
- To filter log sources by keywords in their names, type a keyword text string in the Search all sources containing field.
You can hide the Entity, Host, and/or Type metadata columns to widen the columns that you want to remain visible. Wider column widths help to improve readability and reduce data truncation. To hide or unhide these columns, do the following:
- To filter log sources by keywords in their names, type a keyword text string in the Search all sources containing field.
- On the right side of the metadata columns, click the Configuration icon.
The column selection box appears. - Select or clear the column check boxes to show or hide them as needed. Highlighted blue text on a button indicates that the column is visible. Non-highlighted text indicates that the column is hidden. This procedure affects the columns in both the Select and Selected sources panels.
- When you are finished filtering, select the log sources that you want to add to the Selected sources panel by clicking the Plus icons next to them.
- To add all the filtered log sources to the panel at once, click Add all xx.
- To remove a source from the Selected sources list, click the Minus icon next to it. To remove all the log sources at once, click Remove all xx.
- Click OK.
- On the right side of the metadata columns, click the Configuration icon.
(Optional) Change the repository toggle to search events instead of logs.
For information on Event classifications, see the Event Classifications table.
Select a search filter, and then type a search term in the Search field. For a list of available filters, see the Search Filters table.
(Optional) To include more than one search term for a particular filter or group, click the +Value button to the right of the Search field.
(Optional) To add a filter, click +Filter and select a filter from the list.
As you add filters and groups, use the accompanying lists to build search criteria statements for how you want the filters and groups to be applied. Choose from the following operators:
- All of the following or Any of the following
is or is not (for Log Message, this is contains or does not contain.)
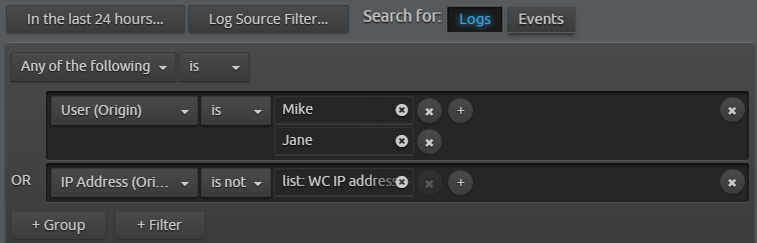
EXAMPLE
The following search is set to find all logs that were either associated with Mike or Jane over the last 24 hours, or logs that did not originate from any of the addresses on the WC IP Address list.
(Optional) For more search criteria, click Advanced. Use the panel on the right of the dialog box to do any of the following:
- Filter by Entity, Permissions, or Log Repository.
- Control the way the results are returned using the options in the Advanced dialog box.
- Save a search or tail. For more information, see Save Searches.
When you are finished defining your search criteria, click Search.
A search task displays in the taskbar indicating that the search or tail is in progress. You can hover your mouse over the search task to view more information.
Additional information regarding the status periodically displays directly above the right side of the taskbar.
Depending on the processing time for a particular search, you may receive a status message in blue font on the search task stating "SEARCHING: FIRST RESULTS"
The "SEARCHING: FIRST RESULTS" message indicates that the first set of results are available (which is usually the first 10,000 logs). If you receive the message, you can click the search task to view the preliminary results while the search continues to run in the background. You will receive notification when the search is complete.If you want to change the processing time, you can change the default Web Console Query Timeout setting. For more information, see Change the Default Web Console Search Timeout Period. You can also change the Query Timeout for an individual search using the Search dialog box. For more information, see Save Searches.
When the search is complete, the search task shows either COMPLETED: ALL RESULTS in blue font, COMPLETED: MAX RESULTS in blue font, or COMPLETED: NO RESULTS
COMPLETED: MAX RESULTS indicates that the search has hit the configured maximum number of results and the remaining results are not returned. The default number of maximum results is 30,000.- When your search has completed, do one of the following:
Click the search task. If your search produced results, the Analyze page appears and displays the results. If your search did not produce any results, the search task is removed from the taskbar.
If you ran a tail, the search task remains in the taskbar and indicates how much time remains in the tail.
- Remove search tasks from your view by doing one of the following:
- Dismiss a single search task without viewing the results by clicking the Close icon.
- Dismiss multiple search tasks at once by doing the following:
- Click the Configuration icon on the taskbar at the lower-right side of the page to open the taskbar inspector.
- Do one of the following:
- To dismiss all search tasks with no results, click Clear Tasks with No Results.
- To dismiss all search tasks that have completed running, click Clear Completed Tasks.
- To dismiss all search tasks that have completed running and those that are still running, click Clear and Cancel All Tasks.