Upgrade CentOS 7 to Rocky Linux 9 using Minimal ISO
Due to changes in how CentOS is handled by Red Hat, LogRhythm has opted to change the officially supported Linux distribution to Rocky Linux. Rocky Linux is built from RHEL repositories and is a very comparable and trusted platform. LogRhythm encourages all customers to consider migrating off of CentOS 7, which will be considered End Of Life by the Red Hat foundation on June 30, 2024. Until this time, LogRhythm will continue to support customers running CentOS to allow time to migrate. An official end of support date for CentOS will be made available at a later time. LogRhythm has published this document to assist with offline or dark site migrations from CentOS to Rocky. As with any OS upgrade, please proceed carefully and ensure that backups or restore points are created to leverage in the event the upgrade fails or is not successful. If you have any questions or concerns about this process, please contact LogRhythm's Customer Success team for clarification or guidance.
Since operating system upgrades carry inherent risks of data loss, it is recommended that you ensure there are backups of your LogRhythm Archives prior to proceeding with any OS upgrade procedure.
If you're upgrading a RHEL machine, LogRhythm does not provide licensing entitlement for Red Hat Enterprise Linux. You can perform the upgrade from a DVD or a mounted ISO downloaded from the Rocky 9 or RHEL repositories. For Rocky 9, the DVD ISO can be obtained here. For the purposes of this upgrade, you may use either the full Rocky 9 DVD or the minimal version.
The LogRhythm-provided new-install ISO for Rocky 9 runs a kickstart that will wipe data on all disks. In a multi-node cluster, the data can be recovered with replica shards, but in single-node cluster, the only way to restore data is SecondLook.
This procedure will walk you through this manual upgrade process where you are replacing the OS.
This process is a full wipe of the Operating System while retaining the mount point where Elasticsearch data is stored. This will delete system logs and all other CentOS 7/RHEL 7-specific configurations or files. Please backup any such files that you require, and/or ensure you have Rocky Linux 9/RHEL 9 installation packages for any utilities/agents you require to run on your systems.
If you have more than one Data Indexer node, it is recommended to upgrade one node at a time and ensure the cluster returns to a green status following the upgrade before proceeding to the next node. This guards against data loss as well as reducing downtime.
Before You Begin
Verify the disk configuration on your Data Indexer (DX) is compatible with this upgrade method. Only DXs built with two or more disks will be able to proceed with this upgrade without data loss. If your DX was built with one disk do not proceed. Elasticsearch should be configured with the default data directory. For DXs with multiple data directories configured, contact LogRhythm Support or Professional Services for instructions.
- The Rocky Linux 9/RHEL9 Setup wizard is requires the following input:
- Root password: A password for the default root account and preferences for it.
- Network configuration: IP address/netmask/gateway, DNS Servers, and NTP Servers.
- Record the DX Cluster Name.
- Download the following packages to be copied to the server after the upgrade, these are required to be installed:
Your disk configuration should look similar to this, where the mountpoint for /usr/local/logrhythm is on a dedicated disk (sda in this example):
lsblk
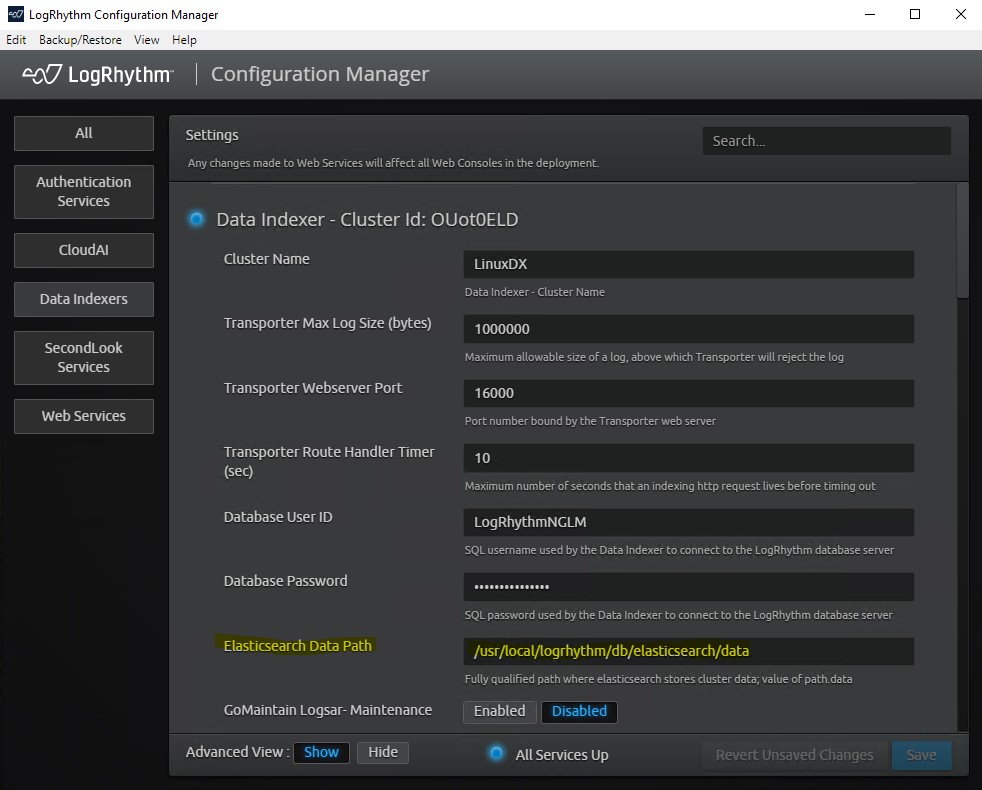
CODE[logrhythm@dx ~]$ lsblk NAME MAJ:MIN RM SIZE RO TYPE MOUNTPOINT sda 8:0 0 39.3T 0 disk └─sda1 8:1 0 39.3T 0 part └─vg_data-lv_usrlocallogrhythm 253:7 0 39.3T 0 lvm /usr/local/logrhythm sdb 8:16 0 223.5G 0 disk ├─sdb1 8:17 0 500M 0 part /boot/efi ├─sdb2 8:18 0 1G 0 part /boot └─sdb3 8:19 0 222G 0 part ├─vgroup1-root 253:0 0 99.5G 0 lvm / ├─vgroup1-vswap 253:1 0 4G 0 lvm [SWAP] ├─vgroup1-audit 253:2 0 21.6G 0 lvm /var/log/audit ├─vgroup1-varlog 253:3 0 21.6G 0 lvm /var/log ├─vgroup1-var 253:4 0 21.6G 0 lvm /var ├─vgroup1-home 253:5 0 43.1G 0 lvm /home └─vgroup1-temp 253:6 0 10.8G 0 lvm /tmp sr0 11:0 1 1.7G 0 rom- Verify your Elasticsearch Data Path is under the correct mountpoint by launching LogRhythm Configuration Manager on your Platform Manager or XM:
System Requirements
LogRhythm SIEM version 7.13.0 introduced support for Rocky Linux 9 and RHEL 9. Upgrading to SIEM version 7.13.0 or later is required before upgrading to Rocky Linux 9/RHEL9.
RHEL Licensing
LogRhythm customers are not entitled to Red Hat Enterprise Linux (RHEL) licensing, nor does LogRhythm have the ability to sell/procure this licensing. The use of RHEL is entirely optional and not required for LogRhythm to function. However, some customers prefer to use non-open-source operating systems that LogRhythm supports due to the compatibility between Rocky Linux 9 and RHEL.
Upgrade Instructions
To upgrade CentOS7/RHEL7 to Rocky Linux 9/RHEL9, do the following:
If upgrading a multi-node cluster, increase the Node Left timeout to 2hrs or more to allow plenty of time for each node to be upgraded without starting shard recovery:
CODEcurl -X PUT "localhost:9200/_all/_settings?pretty" -H 'Content-Type: application/json' -d' { "settings": { "index.unassigned.node_left.delayed_timeout": "2h" }}'- Insert the Installation DVD or mount the installation ISO via a Lights Out Management platform, such as Dell iDRAC.
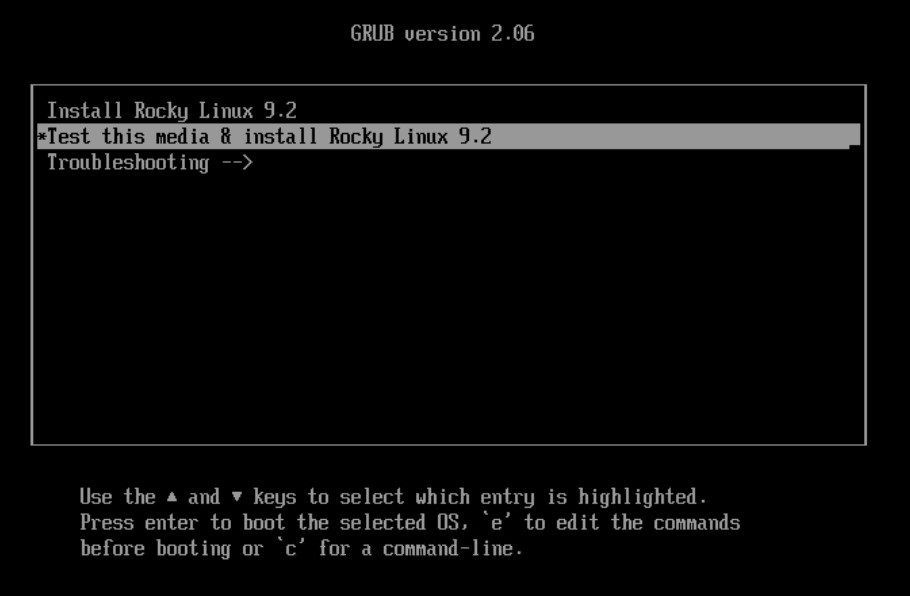
- Boot the server using the Installation Media.
- Select Test this Media & Install Rocky Linux 9.2.
Select your OS Installation Language from the Rocky Linux Installation UI.
(English is the only supported option, but any localization can be selected.)
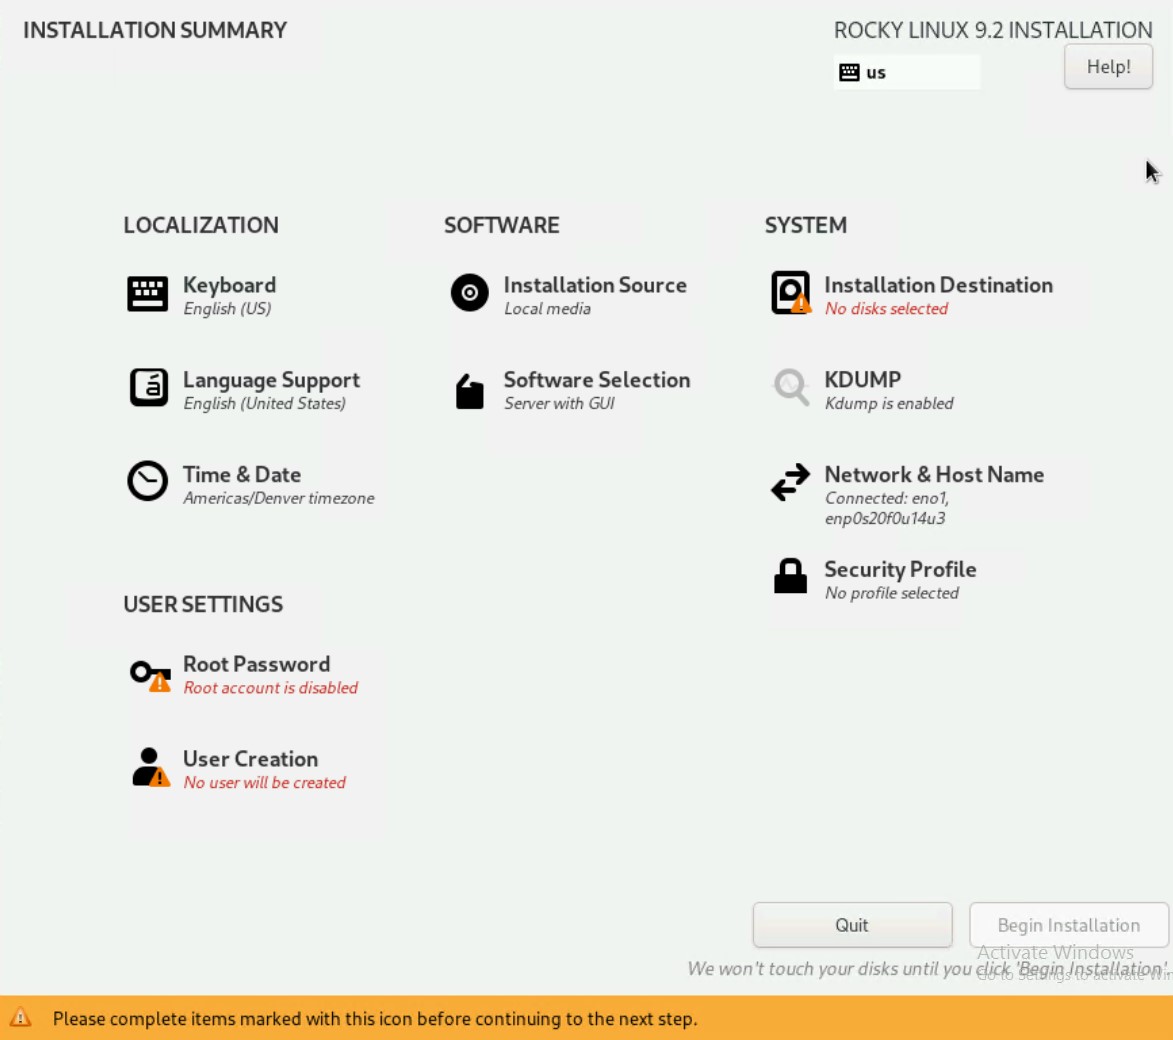
On the Installation Summary Screen, select Installation Destination.
Click on the smaller disk to highlight it, then choose Custom under Storage Configuration.
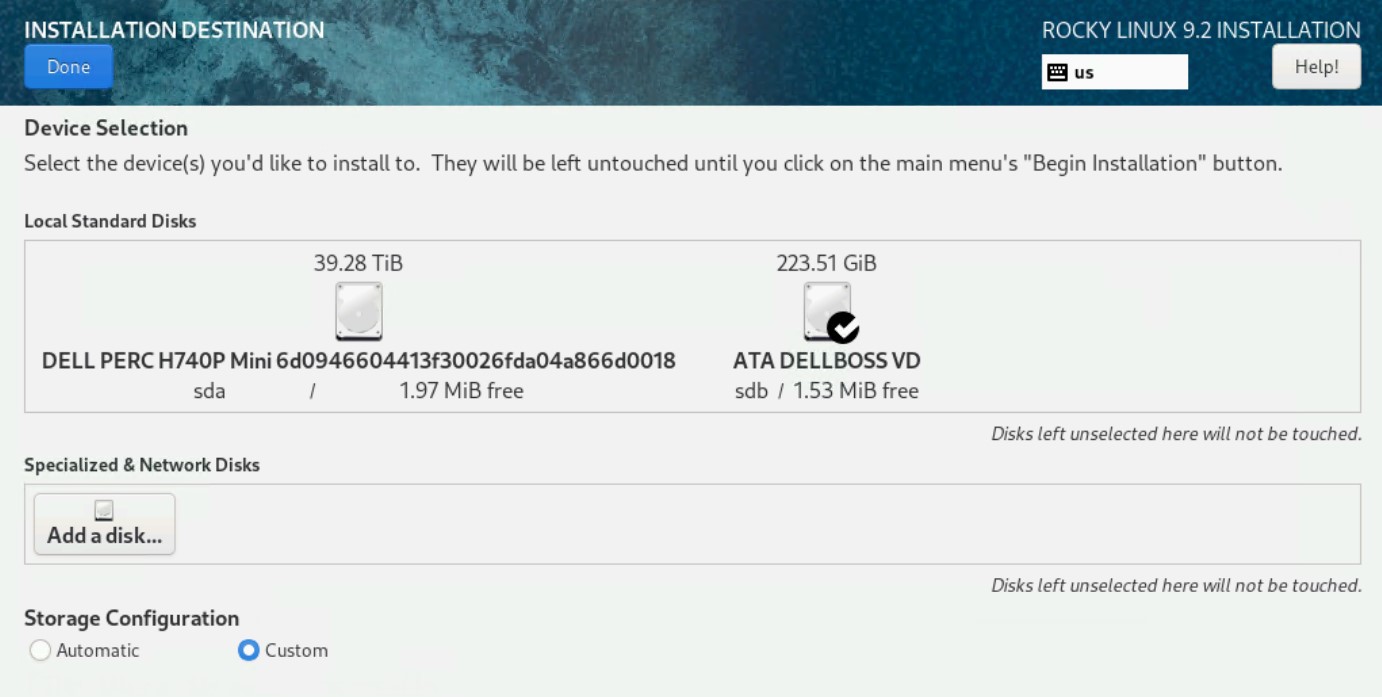
Your configuration may differ, if you only have a single volume do not proceed with this upgrade as it will result in data loss. Your deployment should have a smaller disk containing the OS and /home filesystems, and a very large data partition which contains /usr/local/logrhythm and with it, your Elasticsearch indices. For LogRhythm appliances this will be named "ATA DELLBOSS VD".
Click Done near the top left of the dialog.
Expand the CentOS Linux 7.X.XXXX for x86_64 menu.
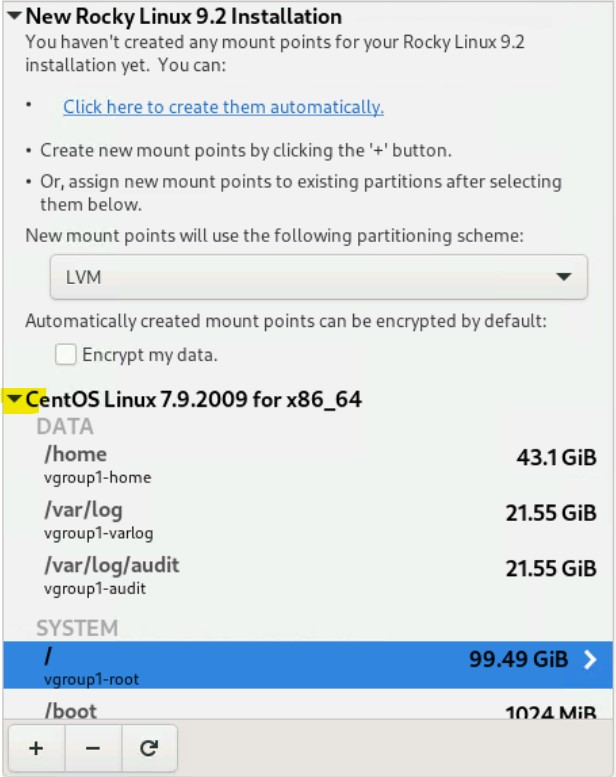
The existing volumes appear.Once you are done configuring your filesystems, you will be presented a summary of what the installer intends to do. Be sure to examine it carefully before continuing.
- Click on the /home partition, and enter /home for the Mount Point.
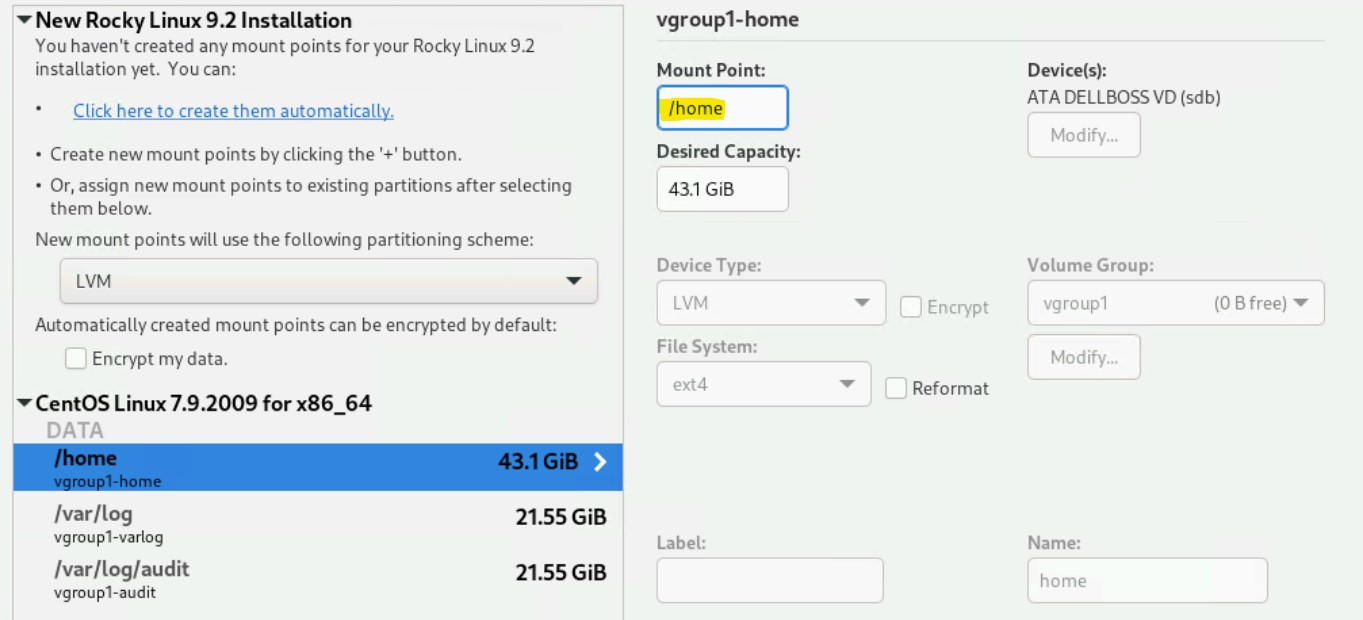
For each remaining partition except for swap, do the same as above, copying the name of the existing partition into the "mount point" name.
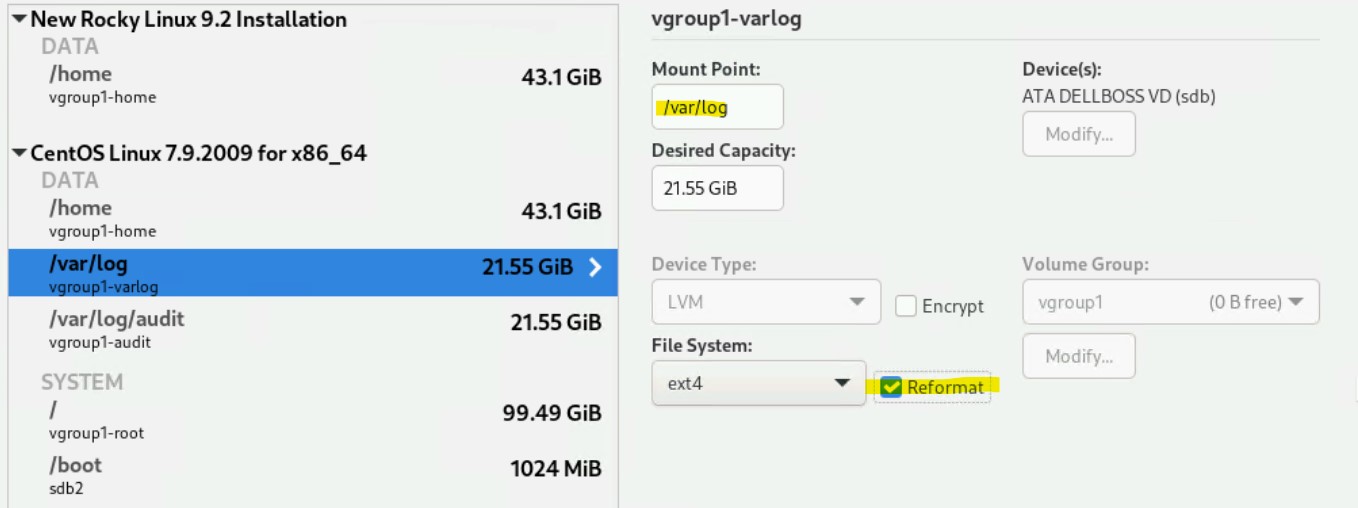
Ensure that the Reformat box is checked.Clicking Reformat allows Rocky Linux 9/RHEL9 to be installed in the old OS's place.
Review your partition configuration, which should look similar to the screenshot below.
All partitions which are being reformatted will list under the "New Rocky Linux 9.2 Installation" section only.
/home will be listed in both, and swap will be listed only under CentOS Linux.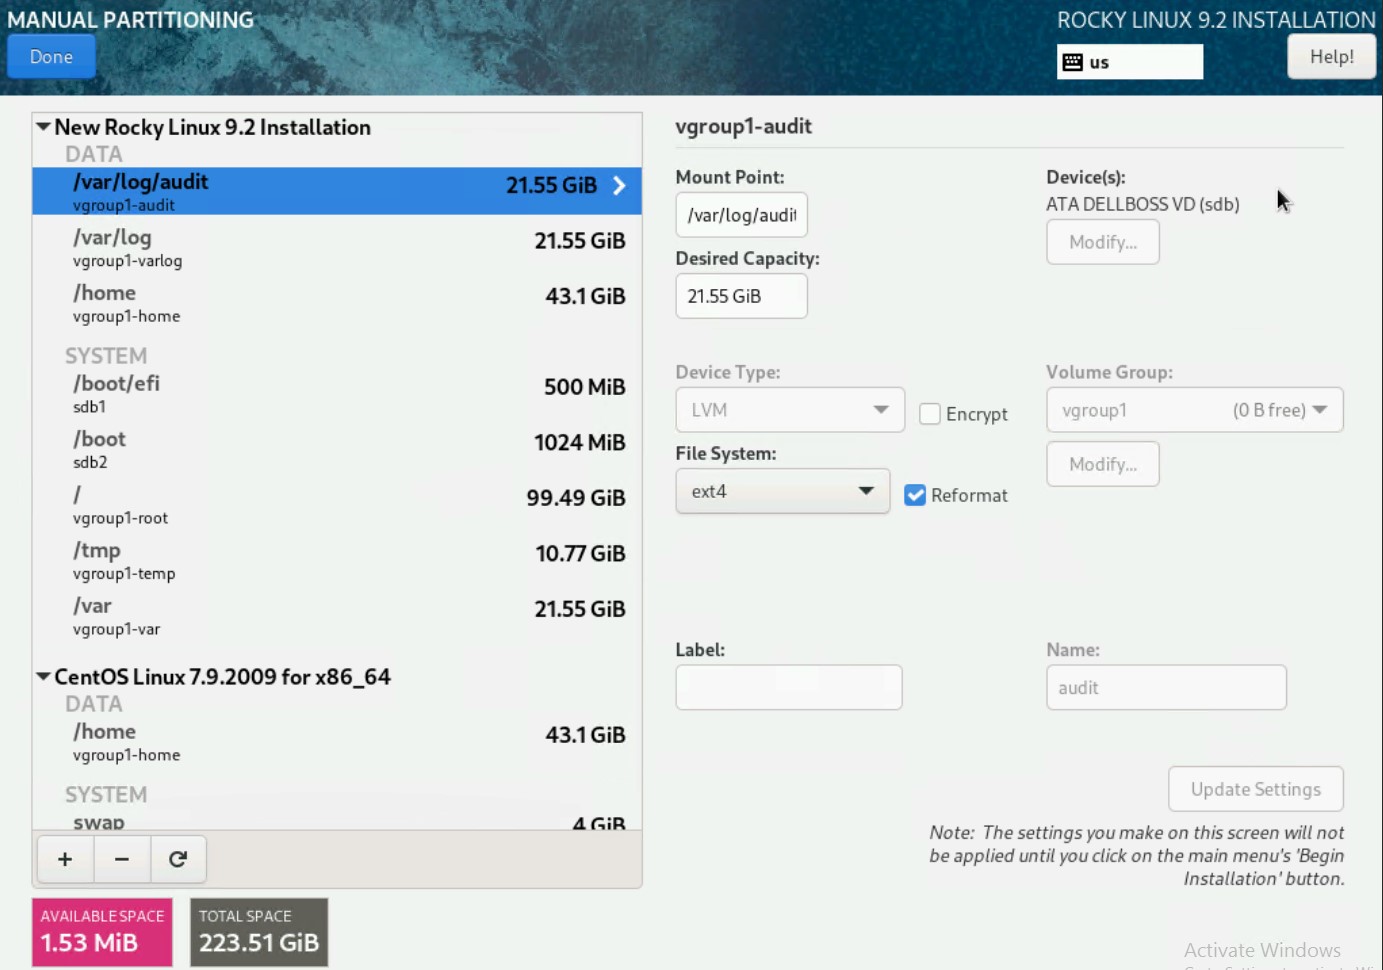
- Click Done.
A Summary of Changes appears, which should match the screenshot below.
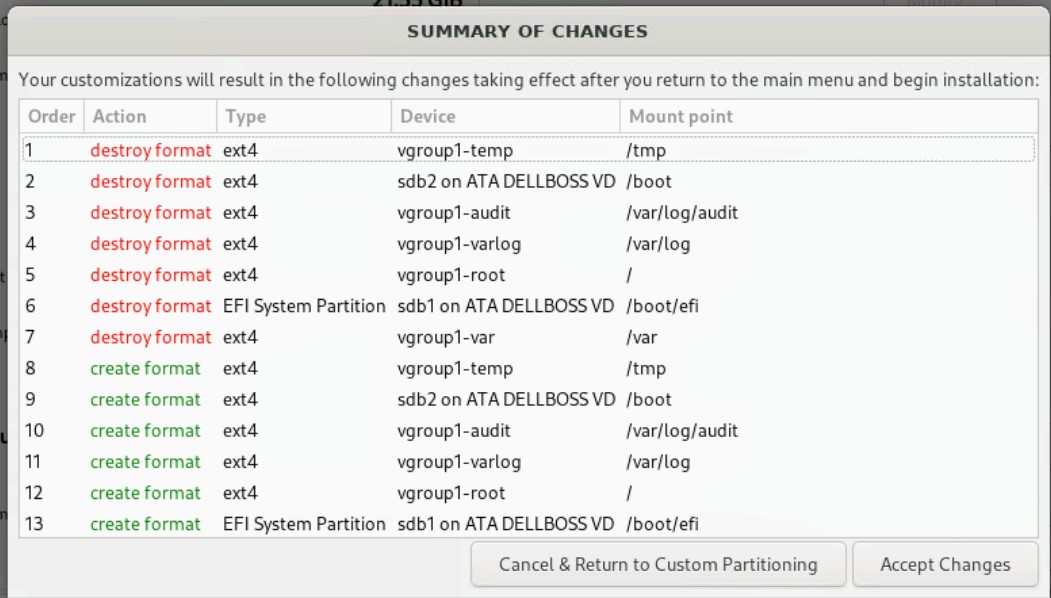
Click Accept Changes.
Be sure none of these filesystems contains the /usr/local/logrhythm filesystem, or important data may be lost. If in doubt, contact Customer Success.
- On the Installation Summary page, ensure Software Installation is configured for Minimal installation.

- Configure the Network & Hostname settings as desired.
This configuration should match your existing settings for IP Addressing, Hostname, etc. Configure the Time & Date settings as desired.
The previous Chrony/NTP configuration from CentOS will not be retained through this upgrade, and the NTP must be reconfigured to function.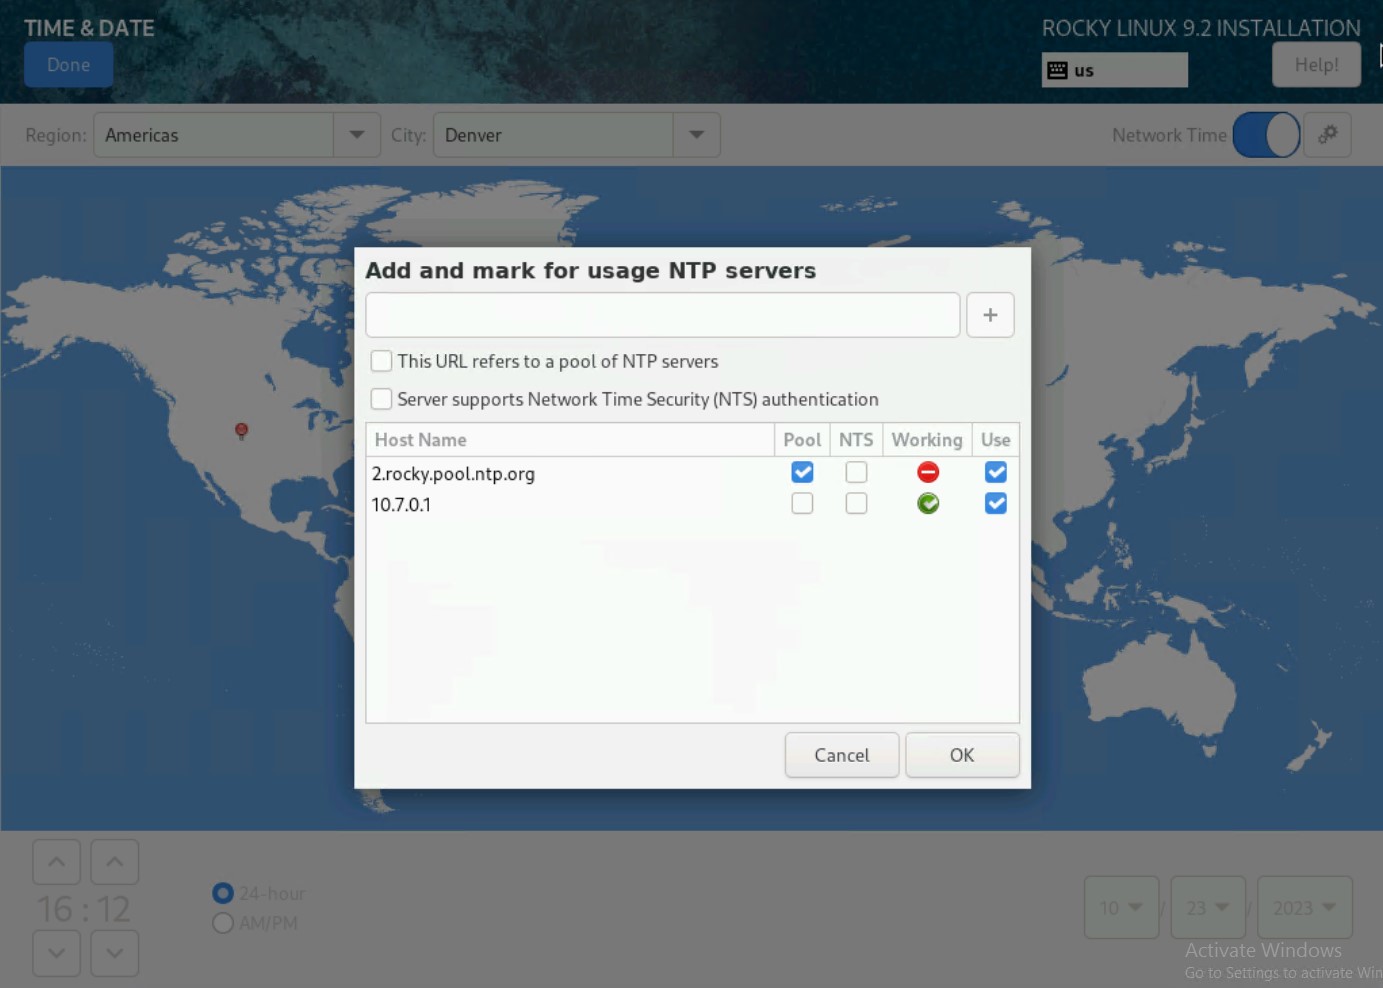
LogRhythm software is very sensitive to time variations. It's important to have a valid NTP configuration in place.
- Configure the Root Password.
You may also choose to disable access to the account per the dialog.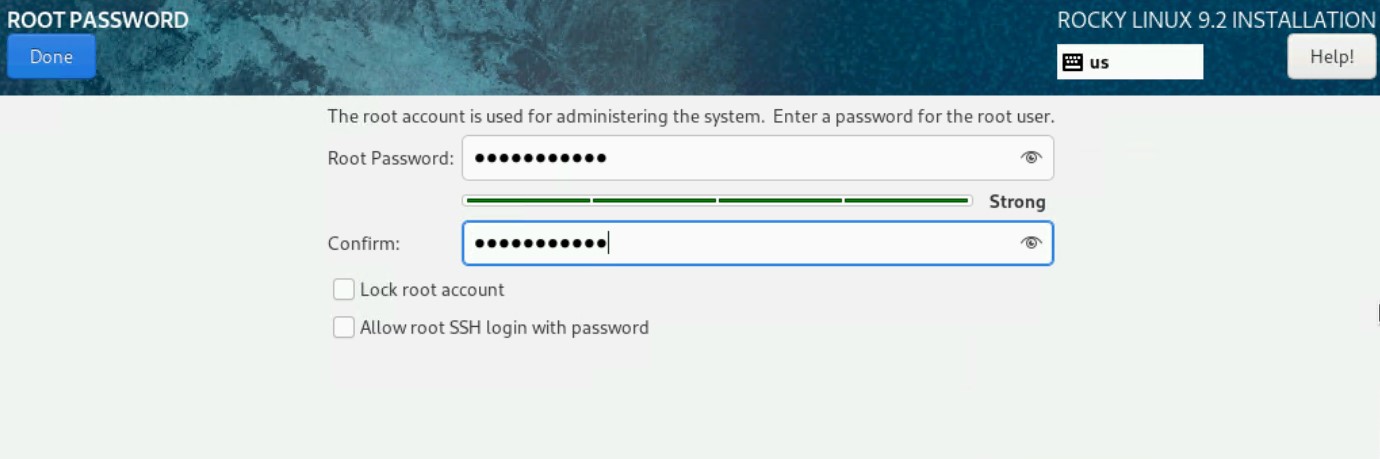
On the Create User screen, configure the logrhythm account:
- username: logrhythm
password: Enter the LogRhythm default password here, or another password of your choosing.
If the root account was not configured for SSH access, you must create another account to SSH into the server.
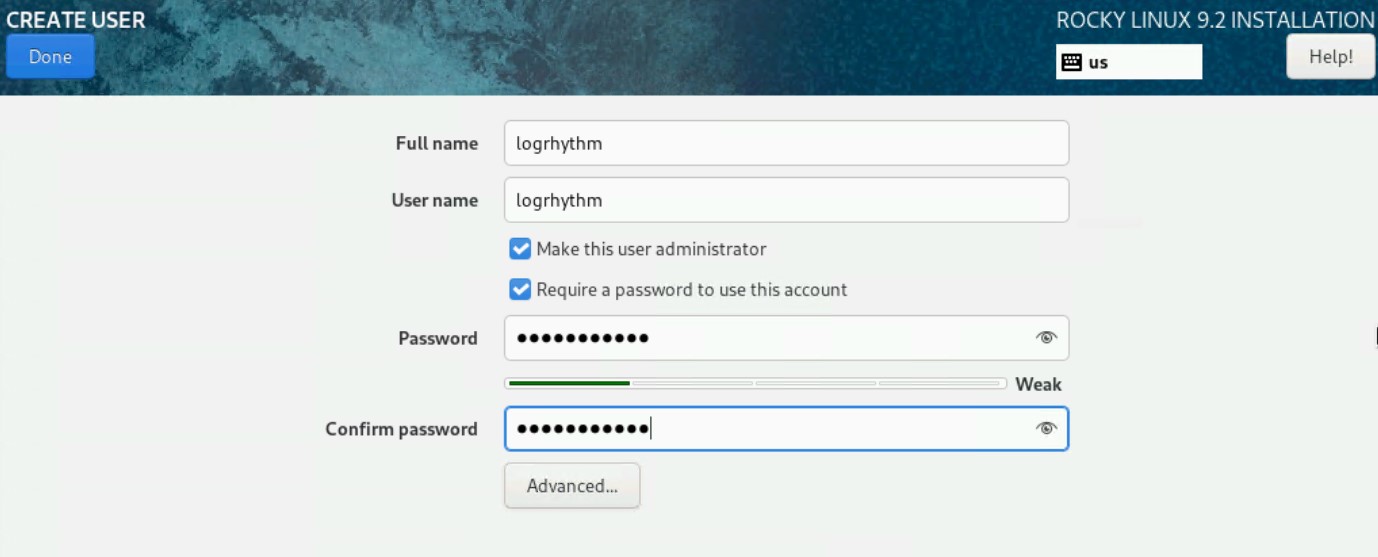
Be sure to record this password for future use, as it will be needed to SSH into the server.
- Review the installation summary page; it should look similar to the screenshot below.
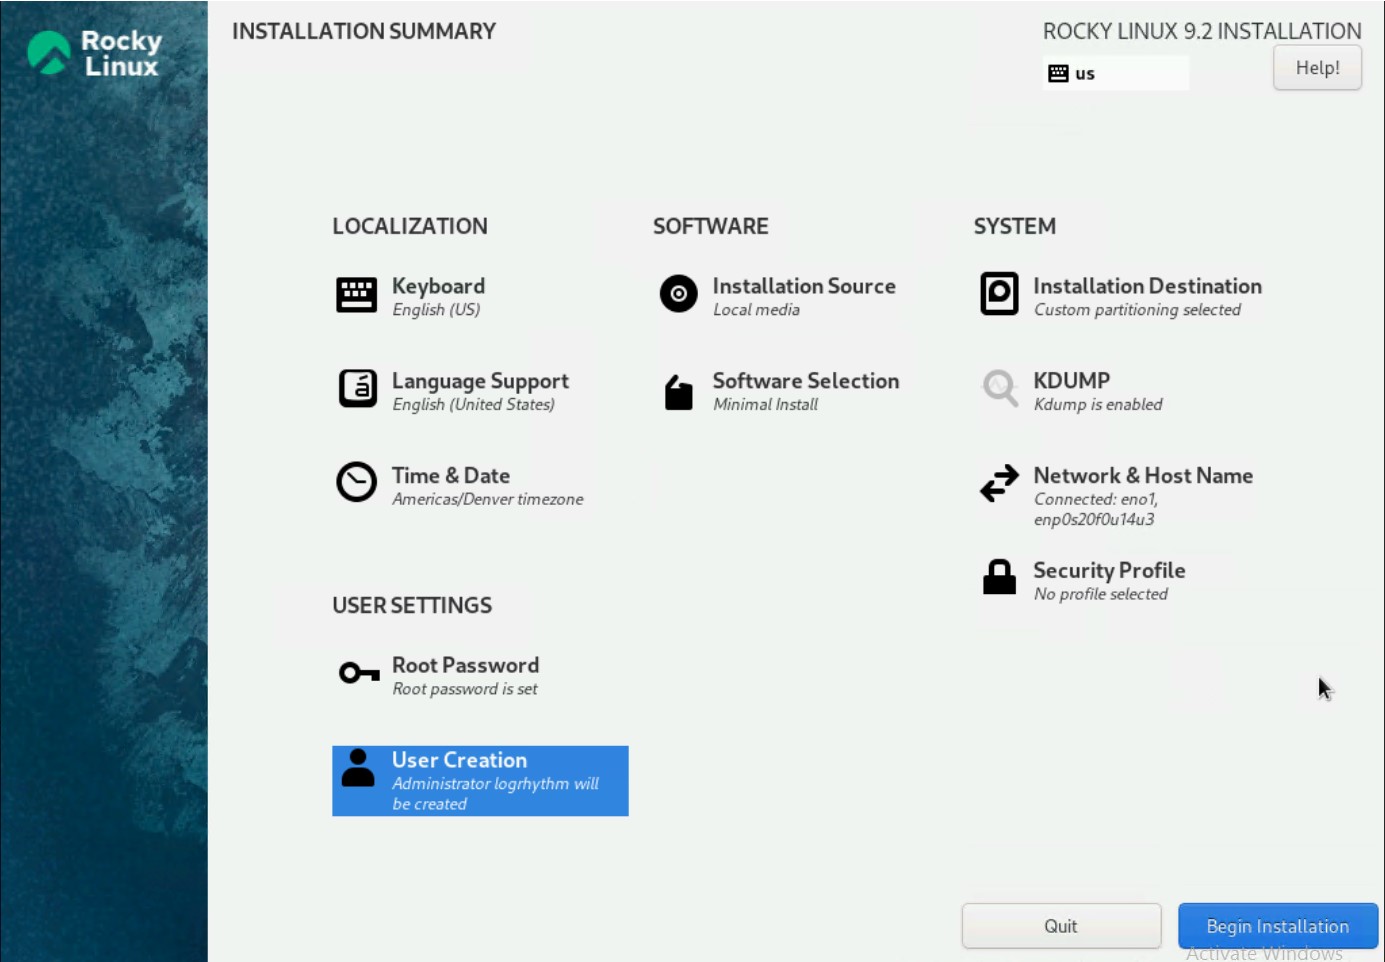
- When ready, click Begin Installation.
The installation can take up to 30 minutes, Restart the machine when prompted.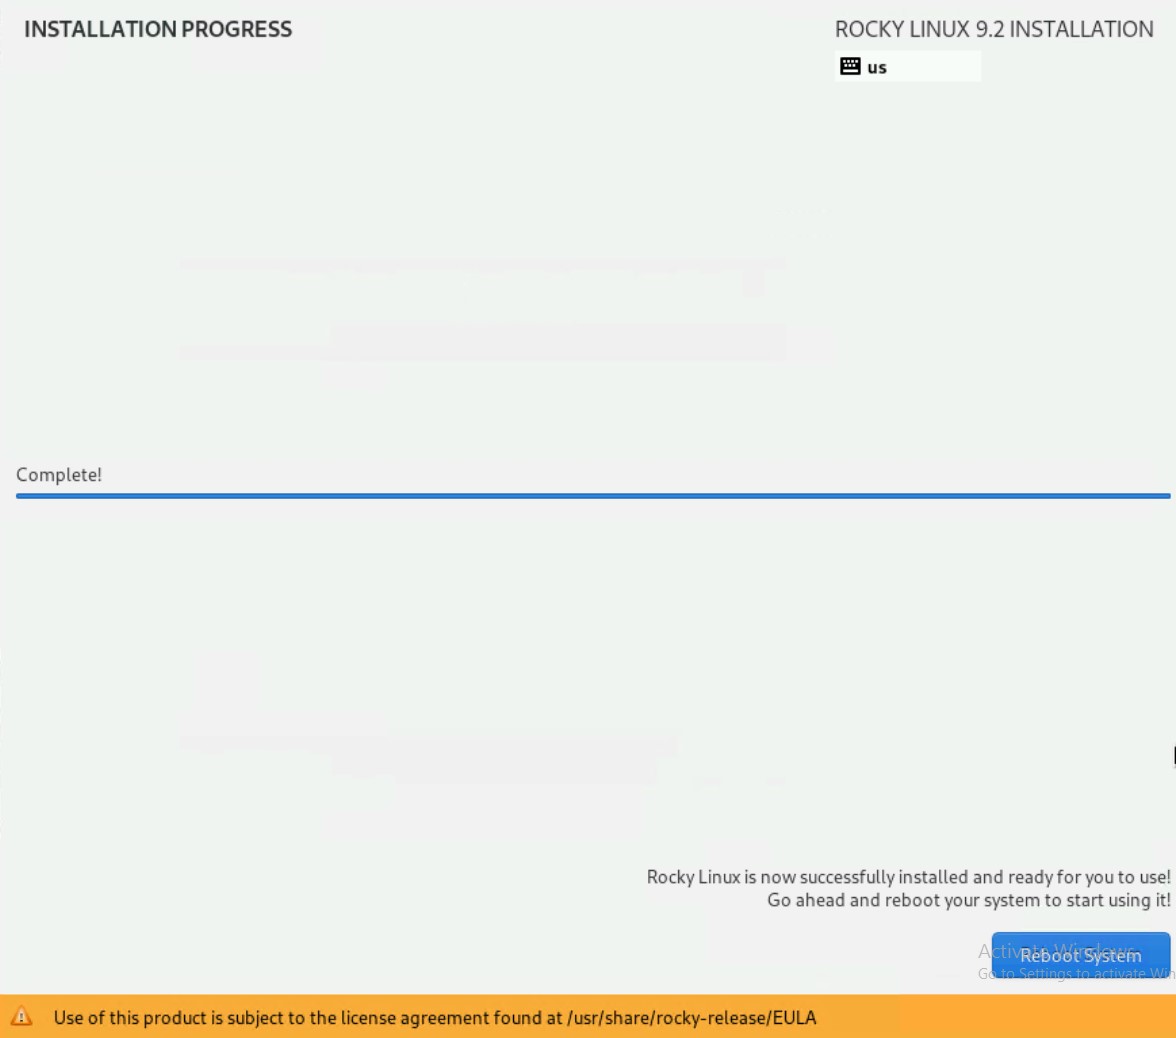
Once the machine has successfully rebooted, login with the logrhythm user created above.
You may be prompted for a Sudo password, which is the same as the password set for the account.Run the following commands:
CODEsudo su echo "logrhythm ALL=(ALL) NOPASSWD:ALL" >> /etc/sudoers mkdir -p /usr/local/logrhythm echo "/dev/mapper/vg_data-lv_usrlocallogrhythm /usr/local/logrhythm ext4 nofail 1 2" >> /etc/fstab mount /usr/local/logrhythm systemctl daemon-reloadThe /etc/fstab entry may vary from environment to environment depending on how your DX storage was configured. The above commands assume your DX was built using the LogRhythm ISO, or is a LogRhythm factory appliance which creates a volume group called "vg_data-lv_usrlocallogrhythm" by default. If your Data Indexer was built in a public cloud environment, on your own hardware, or in a virtual environment, the /etc/fstab configuration may need to be adjusted to mount the data volume correctly. Please consult with LogRhythm Support or Professional Services if you are unsure.
Verify your Disk Partition Layout is correct.
The /usr/local/logrhythm mountpoint should be listed:lsblk
CODE[root@localhost logrhythm]# lsblk NAME MAJ:MIN RM SIZE RO TYPE MOUNTPOINTS sda 8:0 0 39.3T 0 disk └─sda1 8:1 0 39.3T 0 part └─vg_data-lv_usrlocallogrhythm 253:2 0 39.3T 0 lvm /usr/local/logrhythm sdb 8:16 0 223.5G 0 disk ├─sdb1 8:17 0 500M 0 part /boot/efi ├─sdb2 8:18 0 1G 0 part /boot └─sdb3 8:19 0 222G 0 part ├─vgroup1-root 253:0 0 99.5G 0 lvm / ├─vgroup1-vswap 253:1 0 4G 0 lvm ├─vgroup1-audit 253:3 0 21.6G 0 lvm /var/log/audit ├─vgroup1-varlog 253:4 0 21.6G 0 lvm /var/log ├─vgroup1-var 253:5 0 21.6G 0 lvm /var ├─vgroup1-home 253:6 0 43.1G 0 lvm /home └─vgroup1-temp 253:7 0 10.8G 0 lvm /tmp sdc 8:32 1 0B 0 disk sr0 11:0 1 1024M 0 romRemove the existing known host keys from the CentOS 7 installation.
In a multi-node cluster, this step must be performed on ALL nodes prior to running PreInstall.
The IP entered in the command should be the IP address of the machine that was just upgraded.
CODE[logrhythm@localhost Soft]$ ssh-keygen -R 10.7.10.139 # Host 10.7.10.139 found: line 1 # Host 10.7.10.139 found: line 2 # Host 10.7.10.139 found: line 3 /home/logrhythm/.ssh/known_hosts updated. Original contents retained as /home/logrhythm/.ssh/known_hosts.oldDownload and Install the SSHPass package for Enterprise Linux 9, which is required for the PreInstall.sh script to be executed.
This can be downloaded here, Copy the package to your server using an SCP client.CODEsudo rpm -ivh sshpass-1.09-4.el9.x86_64.rpmDownload and Install the tar package for Enterprise Linux 9.
This package is not included with Rocky 9 minimal ISO, and is required for the DX Installer to be run.
You can find the tar package here. Copy the package to your server using an SCP client.
CODEsudo rpm -ivh tar-1.34-6.el9.x86_64.rpmRun the PreInstall script.
Elasticsearch Health Check errors may appear; however, this is expected and they can be ignored.
PreInstall.sh can be executed again to verify the keys.
CODE[logrhythm@localhost Soft]$ sh ./PreInstall.sh Running PreInstall.sh as logrhythm user. Configuring Public Key Authentication. Checking if sshpass is installed (Required before running the Data Indexer install/upgrade). - sshpass is already installed. sshpass install check: OK Checking for existing keys for logrhythm user. Using existing keys. To generate new keys: remove the id_ecdsa and id_ecdsa.pub files from /home/logrhythm/.ssh/ and run the PreInstall script again. Enter logrhythm user password to copy keys to all nodes. SSH Password: Default: /home/logrhythm/Soft/hosts Plese enter the full path to the hosts file: Upgrade Detected. Error querying Consul agent: Get "http://127.0.0.1:8500/v1/kv/services/lr-dx-config/OUot0ELD/configs/DX_ES_PATH_DATA": dial tcp 127.0.0.1:8500: connect: connection refused Error querying Consul agent: Get "http://127.0.0.1:8500/v1/kv/services/lr-dx-config/OUot0ELD/configs/DX_ES_PATH_DATA": dial tcp 127.0.0.1:8500: connect: connection refused Elasticsearch data path is set in consul, using the consul value. ClusterID: OUot0ELD Cluster Name: LinuxDX Data Path: Using /home/logrhythm/Soft/hosts file to copy keys. ****Reading hosts file**** Setting SSH passwordless login for host 10.7.10.139 /usr/bin/ssh-copy-id: INFO: Source of key(s) to be installed: "/home/logrhythm/.ssh/id_ecdsa.pub" /usr/bin/ssh-copy-id: INFO: attempting to log in with the new key(s), to filter out any that are already installed /usr/bin/ssh-copy-id: WARNING: All keys were skipped because they already exist on the remote system. (if you think this is a mistake, you may want to use -f option) Keys copied successfully to host 10.7.10.139. **************************** Verifying permissions on hosts for Pulic Key Authentication on DX Setting permssions on /home/logrhythm directory to 700. Checking for cluster name in data path. Checking for directory /LinuxDX ClusterName in data path check: OK Host configuration updated on DX Checking cluster health. Elasticsearch cluster health must be green before proceeding with upgrade. The Elasticsearch cluster health MUST be green before performing the upgrade. - Please verify the elasticsearch service is started on all nodes before proceeding. - Verify the cluster health is 'green' using: curl localhost:9200/_cluster/health?pretty - If still having issues, please review the /var/log/elasticsearch/<clustername>.log for more information. ************************************************************** Testing ssh as logrhythm user using Public Key Authentication. -- DX: SSH OK PreInstall complete. Please review output for any errors. These errors should be corrected before executing Data Indexer installer.Run the Data Indexer installer with the --force and --es-cluster-name options to reinstall the services and restore OS specific configurations.
If you have a multi-node cluster, it is recommended you re-run the Data Indexer Installer from the same node you originally installed it.Ensure the DX Cluster Name matches your cluster name from prior to the OS upgrade. Changing the DX Cluster Name could result in data loss.
This will start the remaining DX services when the install is finished, and your data should be accessible.
CODEsudo sh ./LRDataIndexer-13.59.0.0.x86_64.run --hosts /home/logrhythm/Soft/hosts --plan /home/logrhythm/Soft/plan.yml --es-cluster-name LinuxDX --forceIf you have a multi-node cluster and are stepping through OS upgrades, you will have to re-run the DX installer after each node has been upgraded. (ie. a five-node DX cluster will require the DX installer to be run five times, once on each node, as you step through upgrading the OS one-by-one.)
Run the following commands to update service ownership to the following directories in order for the LogRhythm Common services to function.
CODEsudo chown -R LogRhythmAPIGateway.LogRhythmAPIGateway /usr/local/logrhythm/LogRhythmAPIGateway sudo chown -R LogRhythmMetricsCollection.LogRhythmMetricsCollection /usr/local/logrhythm/LogRhythmMetricsCollection sudo chown -R LogRhythmServiceRegistry.LogRhythmServiceRegistry /usr/local/logrhythm/LogRhythmServiceRegistry sudo systemctl restart LogRhythmAPIGateway LogRhythmMetricsCollection LogRhythmServiceRegistryFor DX7500 models which have two Elasticsearch processes installed, you need to restore permissions to the secondary data directory after the DX installer is run, and also re-run the Nodes Installer to re-install the second Elasticsearch instance:
CODE[logrhythm@localhost elasticsearch]$ sudo chown -R elasticsearch:elasticsearch /usr/local/logrhythm/elasticsearch-data [logrhythm@localhost elasticsearch]$ sudo sh ./LRDXNodeInstaller-13.64.0.1.x86_64.run --hosts /home/logrhythm/Soft/hosts --addCheck the Cluster Health status.
It should be "Green."Multi-node clusters or clusters with many indexes may take some time to transition from Red to Yellow to Green.
Monitor the "active_shards_percent_as_number".
CODE[logrhythm@localhost elasticsearch]$ curl localhost:9200/_cluster/health?pretty { "cluster_name" : "LinuxDX", "status" : "green", "timed_out" : false, "number_of_nodes" : 1, "number_of_data_nodes" : 1, "active_primary_shards" : 18, "active_shards" : 18, "relocating_shards" : 0, "initializing_shards" : 0, "unassigned_shards" : 0, "delayed_unassigned_shards" : 0, "number_of_pending_tasks" : 0, "number_of_in_flight_fetch" : 0, "task_max_waiting_in_queue_millis" : 0, "active_shards_percent_as_number" : 100.0Check your indexes to validate that historical indexes from prior to the upgrade are present.
In the example below, the output has only one day of indexes; however, typically many days should be present.
CODE[logrhythm@localhost elasticsearch]$ curl localhost:9200/_cat/indices/logs-* green open logs-2023-10-23 nRhq6zUXStCK1RUSrmU8kg 2 0 6384661 2563 2gb 2gbValidate all spooling has cleared from the "DXReliablePersist" folder in the Data Processor State directory before proceeding to upgrade any further nodes.
Reinstall the LogRhythm Agent if it was previously installed and configured using the steps outlined at Install a System Monitor on UNIX/Linux.