
Install the High Availability Software for HA + DR
Run the High Availability Setup Tool
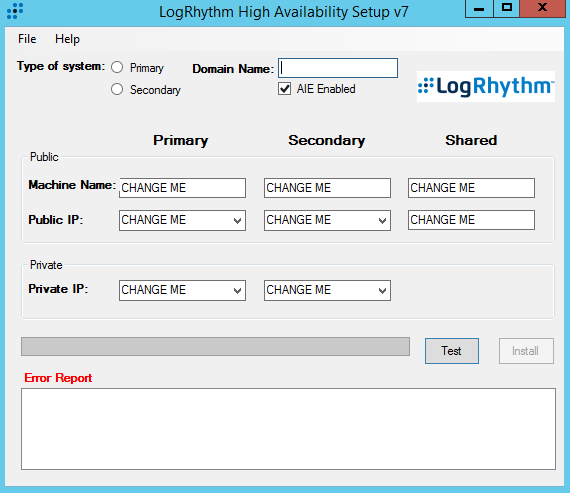
The HA Setup tool allows you to complete the necessary information for SIOS to work properly. You must enter the Domain Name (Optional), Public and Private IP Addresses, and Machine Names. The tool validates the input and prompts the user to start the installation of SIOS HA software.
The HA Setup tool can be found in the root of the HA installation directory (LogRhythm High Availability Setup.exe).
Two Ways to Use the HA Setup Tool
- On-site configuration and testing. Run HA Setup on the Primary and Secondary servers to test that all values work in the given environment.
- Off-site configuration. The HA Setup can be run on any system (requires .NET 4.0) and allows for exporting the XML configuration file for future use on an HA pair. Once on-site, the configuration file can be imported to the tool and tested.
Configure the Primary or Secondary Machine
Select the radio button for a primary or secondary machine. This step is optional if you are doing an offsite configuration. The program detects and populates the name and IP information for the corresponding section.
(Optional) Set Domain Name
In Active Directory domain environments, the HA Setup attempts to detect the domain name. If it is unable to find the domain name, the field is empty and you need to add the correct domain name. For workgroup environments, the Domain Name field may be left empty. Example: mytestdomain.com
Enable AIE
Newer LogRhythm systems may include the AIE services, providing customers the option of running AIE on their PM/XM, or on a dedicated AIE system. The default setting for AIE Enabled is true, meaning that HA is configured to protect AIE on the box. If the customer has a dedicated AIE system, or does not wish to use AIE, then clear the AIE Enabled check box.

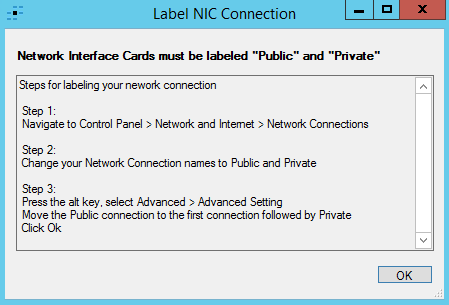
Configure Public Network Connections
The Public section represents the names and IP addresses that will be visible to the production network and contains three columns: Primary, Secondary, and Shared.
- Primary. The main server in the HA pair.
- Secondary. The failover or secondary server in the HA pair.
- Shared. The shared Machine Name and IP Address that moves between systems depending on which node is active.
Enter the Machine Name and Public IP Address for Primary, Secondary, and Shared.
The Shared Machine Name and Shared Public IP should be unique and not found anywhere else on the network.
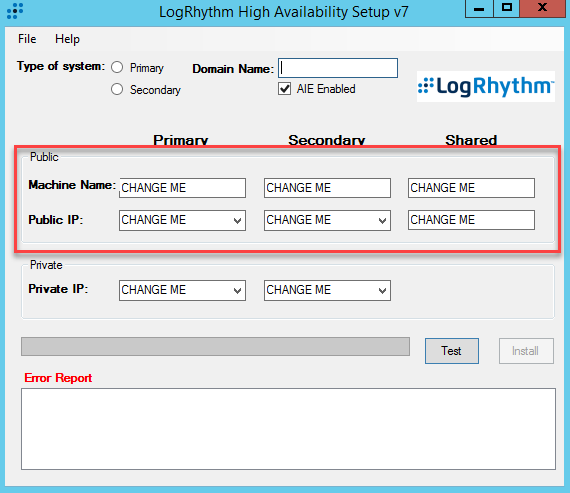
Configure Private Network Connections
The Private section represents the private physical connection to the other HA system (usually a crossover cable).
Enter the Private IP Address for the Primary and Secondary systems.
Test the Configuration
After you have entered the required information, click Test. The test button first validates the required fields. If the fields are blank or have invalid information, the error icon appears next to the item that needs to be fixed. Hover over the error icon for additional information about the error.
After all the fields are verified, the test validates that the Primary and Secondary IP addresses are accessible, and then verifies that the Shared IP address and Shared Name are unique on the network.
Configuration problems discovered during the test are displayed in the Error Report section at the bottom of the window. The program advises which fields need to be modified, and why. The test can be run as many times as needed until all items have passed.
After the program has successfully completed a test, the Install button is enabled.
Export
Exporting provides the capability of creating an XML file that can be imported into another HA Setup tool. For instance, once the validation steps have passed successfully on the primary system, the configuration can be exported as an XML file, which can then be imported on the secondary node.
To export a file, click File, Export, XML, and choose a location to save the file.
Import
Importing a file is a fast and easy way to configure the HA setup.
To Import a file, click File, Import, XML, and then browse to the location of the HA_Config.xml file.
Edit
Editing provides the capability to go back and modify field values after testing.
To enable editing after a test, click File and Edit.
Install the High Availability Software
Run the Install Script
- To launch the installation script, click Install.
The HA Setup tool closes and a PowerShell window displays the appropriate script for an XM, PM, or DP. - Press Enter to continue.
- If prompted, supply the password for the SQL sa account. If the script is able to connect to SQL via LogRhythm default or Windows credentials, you are not prompted for credentials.
The script runs for several minutes. - When complete, review the output for any errors. Then press Enter to reboot the system.
Configure HA on the Secondary HA Node
Repeat the same steps on the secondary node of the HA pair.
(Optional) Import the XML Configuration File
- Click File, Import, XML, and then locate the XML file that was exported from the primary node.
- To validate the configuration, click Test.
- To launch the installation script, click Install.