Configure the New HA Deployment
Configure the New HA Deployment
Verify the Installation
To confirm the installation was successful, look in Programs and Features for the following new programs:
- LifeKeeper for Windows v8 Update 7
- LifeKeeper Microsoft SQL Server Recovery Kit v8 Update 7
- SIOS DataKeeper for Windows v8 Update 7
- Microsoft Visual C++ 2015 Redistributable (x64) – 14.0.23026
- Microsoft Visual C++ 2015 Redistributable (x86) – 14.0.24215
Additionally, you can review the log file from the script in the \Logs directory to check for any error messages.
Verify the Initial LifeKeeper Configuration
- Run the LifeKeeper GUI on the primary system (Start, All Programs, SIOS, LifeKeeper, and then LifeKeeper (Admin Only)) as an Administrator
- Log on using local admin credentials. An IP and Name resource should be displayed, and the primary server icon should contain a yellow triangle.
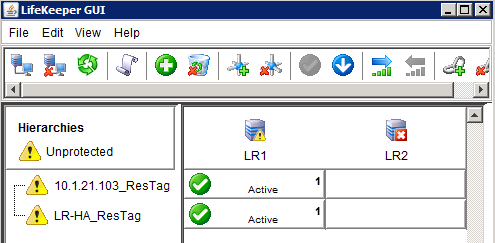
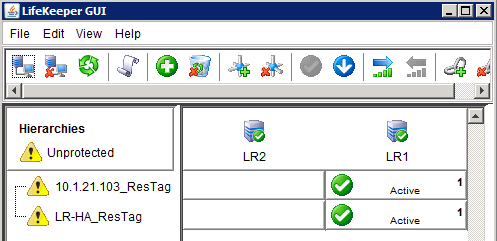
The yellow triangle on the server icon indicates that communication paths were setup from Node 1 to Node 2, but not in the other direction. Once the install process has run on the secondary server, the yellow icon should change to a green check. The same interface, viewed from the secondary server after a completed installation, looks like this:
Configure LifeKeeper and DataKeeper Service Accounts
The following steps must be performed on both nodes.
In order to function properly, the LifeKeeper and SIOS DataKeeper services should be set up to run as an account with local administrator credentials on the systems. These can either be domain accounts, or local accounts as long, as the same accounts and passwords are created on both systems.
- Open the Services console, right-click the LifeKeeper service, and click Properties.
- Select the Log On tab and enter the credentials for the account you wish to use.
- Repeat for the SIOS DataKeeper service, and then for both services on the other node.
Start Elasticsearch on XM Nodes
- Open the Services Console, right click the LogRhythm DX – Elasticsearch Service and select Start, if the service is not already started.
- Perform this step on each XM node in the deployment.
Configure LogRhythm
Before the rest of the HA configuration can be done, LogRhythm needs to be configured on the primary node to work with the shared Name and IP.
Click Start, All Programs, LogRhythm, and then open the Local Configuration Managers (LCM) for each LogRhythm service.
The Server field for each should contain the Shared Name or IP of the HA pair.
For a PM/DP configuration, configure Job Manager, Alarming and Response Manager, and the System Monitor Agent on the PM system. On the DP system, configure the Mediator and the System Monitor Agent. Make sure that the DP shared IP is used for the Data Processor Connection Settings, and the PM shared IP is used for the Platform Manager Connection Settings. For XM configurations, all services are configured on the same system, using the same shared IP.For the System Monitor LCM, the Data Processor IP and System Monitor IP should both be the Shared IP of the HA pair.
If you plan to enable AIE on this system, make sure to configure it before continuing. If you do not plan to enable it, the services can be disabled in the services console.- After all services are configured, open the LogRhythm Console. Log on using the Shared Name or IP.
- On the New Deployment Wizard, use the Shared Name and IP.
Continue through the Knowledge Base Import Wizard and the License Wizard, and then select the appropriate platform from the platform selector in Platform Manager Properties and Data Processor Properties.
For a PM/DP pair, a Data Processor record and an Agent record needs to be manually created using the Shared Name and Shared IP of the DP.- Set the active and inactive archive locations to the D: drive (Gen4) or the S: drive (Gen5) in the Data Processor properties, and the values of NetflowServerNIC, sFlowServerNIC, and SyslogServerNIC to the Shared IP in the agent properties.
LogRhythm Configuration for AIE or Collector
If you have an AIE system or an XM or PM running the AI Engine service, the following steps must be completed before the rest of the High Availability configuration can be done.
Configure LogRhythm on the Primary Node to Work with the Shared Name and IP
- Click Start, All Programs, LogRhythm, and then LogRhythm System Monitor Configuration Manager.
- Enter the Data Processor IP.
- In the System Monitor IP Address field, enter the Shared IP of the HA pair.
Create Host and System Monitor Records for the Shared Agent
- From the LogRhythm Console, click Deployment Manager on the main toolbar, and then click the Entities tab.
- Select the Entity where the shared agent should go. The default is Primary Site.
- Right-click the Entity Hosts area and click New Host.
- Enter the name for the shared agent and then click the Identifiers tab.
- Enter the shared IP and each of the system IPs for IP Address identifiers.
- Enter the shared name and each of the system names for Windows Name identifiers.
- Click OK.
- Click the System Monitors tab, right-click in the lower pane, and click New.
- Choose the host record from the previous step that the Host Agent is installed on.
- Enter the System Monitor Agent name.
- On the Data Processor Settings tab, select the Data Processor this agent will use, and enter the shared IP for the Agent IP/Address Index.
- If any syslog or flow collection will be performed by this agent, select Advanced and change the value of SyslogServerNIC, NetflowServerNIC, and sFlowServerNIC to the shared IP.
Configure the AI Engine Service
- Click Start, All Programs, LogRhythm, and then open the local Configuration Manager (LCM) for the LogRhythm AI Engine service.
- On the General tab, in the Platform Manager Connection Settings, enter the information for the PM.
Create a New AIE Record
- From the LogRhythm Console, click Deployment Manager on the main toolbar and then click the AI Engine tab.
- Click the Servers tab.
- Right-click and select New.
- Choose the host record from the previous step.
- Enter the AI Engine Name.
- Select a workload and click OK.
Re-Run the LogRhythm Infrastructure Installer
Now that a shared IP has been established, you must run the LogRhythm Infrastructure Installer again to generate a new plan file that contains the shared IP.
The following steps must be performed prior to building the appliance resource hierarchy. If the hierarchy is built first, the D: drive (Gen4) or the S: drive (Gen5) drive will be locked and the Infrastructure Installer will fail. For additional details about running the LogRhythm Install Wizard or Infrastructure Installer, refer to the LogRhythm software installation guide, or any of the software upgrade guides.
- From the start menu of the active HA node, search for and launch the LogRhythm Infrastructure Installer (C:\Program Files\LogRhythm\LogRhythm Infrastructure Installer\dependencies\deptoolgui\lrii.exe).
- Select Add/Remove Host.
- Remove the individual IPs for the HA nodes and replace them with a single host with the HA shared IP.
- If needed, add the IP addresses of other participating hosts in your LogRhythm deployment, and then click Create Deployment Package.
- Choose a folder to export the deployment package and select Next Step after the export is complete.
- After the deployment package is created, click Run Host Installer on This Host.
Leave this window open until the final step of this section. - Copy the deployment package (Windows executable and plan file) to a location on the secondary node in the HA cluster.
- Log on as an administrator on the Secondary node and open an elevated command prompt (Run as administrator).
- Change directories to the location of the LRII_Windows.exe file that was copied over previously (for example, cd "C:\Users\Administrator\Desktop\Deployment Package").
- Run the following command: .\LRII_Windows.exe --ha-secondary=<HA shared IP address>
- Verify that the executable finishes without any errors before continuing to the next section.
- Run the LRII exe from the deployment package on each additional LogRhythm host in the deployment.
- Return to the active HA Node and select Verify Status to confirm that all LogRhythm Host Installers have completed successfully before continuing to the next section.
Build the Appliance Resource Hierarchy
The following steps need to be performed on the primary node only. For a PM/DP pair, this step should always be performed first on the primary PM node and then on the primary DP node.
Each of the LogRhythm services will be protected by LifeKeeper by using the Generic Services Recovery Kit. The Generic Services Recovery Kit makes use of a set of scripts to communicate with the Windows Service Control Manager with the “sc.exe” command.
Run 2_HA_Build.cmd
- On the primary node, right-click the 2_HA_Build.cmd file and click Run as administrator.
A PowerShell window opens with the build script. Press Enter to continue. If prompted, supply the password for the SQL sa account. If the script is able to connect to SQL via LogRhythm default credentials, you are not prompted for credentials.
The script builds the SQL hierarchy, adds the monitored services, and adds each of the monitored databases before proceeding on to create the hierarchies for the LogRhythm services. When finished, the script displays a Setup Complete message and allows you to review the output before closing the window.
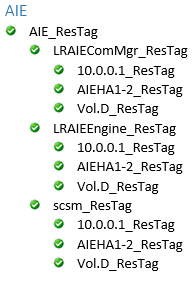
Switch back to the LifeKeeper GUI and verify that you have a completed resource hierarchy that looks like the following:
On a Gen5 appliance, the Vol.S_ResTag replaces the Vol.D_ResTag for the following:
LogRhythmApIGateway_ResTag
LRAIEComMgr_ResTag
LRAIEEngine_ResTag
scmedsvr_ResTag
scsm_ResTag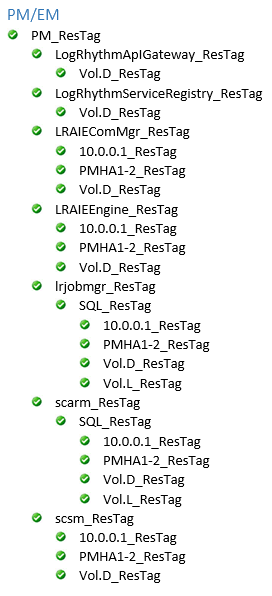
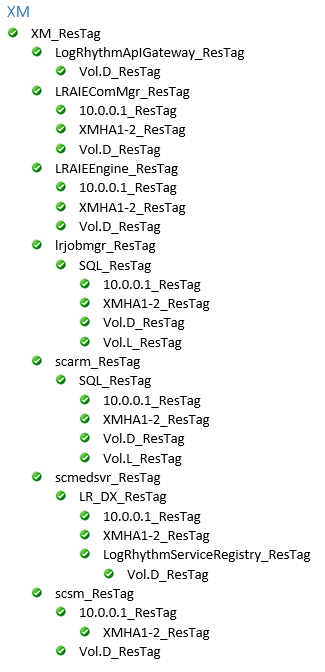
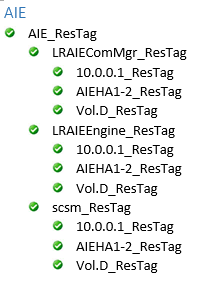
The LRAIEComMgr_ResTag and LRAIEEngine_ResTag resource hierarchies are only displayed if you selected the AIE Enabled check box in the HA configurator.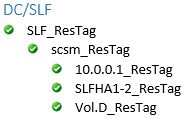
Configure Connections to the EMDB
Platform Manager components, including ARM and the Job Manager, may be configured to connect to the EMDB using the 'localhost' address. Non-Platform Manager components, including Data Processors, AIE, and Data Indexers, should point to the HA Shared IP for their EMDB connections. Agents should point to their respective Data Processors, and should use the shared HA IP if those Data Processors are part of an HA pairing.
Update SQL Credentials in LifeKeeper
The build script is unable to properly supply the SQL credentials to LifeKeeper, so the credentials must be manually updated.
- Right-click the SQL_ResTag hierarchy and click Properties. Verify that the services and databases are all monitored, and then click Admin Actions.
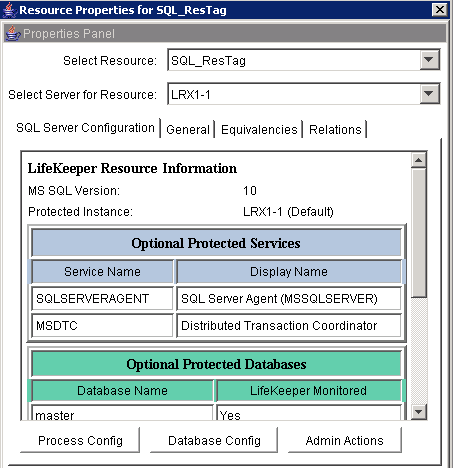
- Click Next to Manage User, select Change User and Password in the drop-down menu, and then click Next again.
- Enter a SQL admin account (sa) and password to complete the wizard.
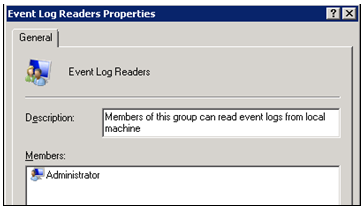
Configure Remote Event Log Collection
The System Monitor should not collect Windows Event Logs from the local system directly. Instead, the Shared System Monitor should collect these logs from each node of the cluster using Remote Host Event Log Collections. To facilitate this, the System Monitor Agents need to be configured to log on as an account with local administrator privileges. This can be a local or domain account, and should be the same on both nodes. On the Log On tab, enter administrator credentials. The identifiers for each record should be only the public IP address of the system (that is, for AIE1-1, the host record will be AIE1-1-EL and the only identifier will be the public IP address).
Extend the Resource Hierarchy to the Secondary Node
The following steps need to be performed on the primary node.
- Extending the hierarchy is the process that LifeKeeper uses to copy identical configuration and resource details to the other node in the cluster.
- This section assumes that you have been performing all configurations on the system that has current customer active data on it, and these volumes will be the source of the replica.
- The steps in this section may not always come in the order displayed. Expect to create two volume resources, as well as one IP resource.
- In the Hierarchies Pane, right-click XM_ResTag, PM_ResTag, AIE_ResTag, or DC_ResTag, and then click Extend Resource Hierarchy.
- In the Extend Wizard, select the secondary system and click Next.
- Make sure all the pre-extend checks were successful, and then click Next.
- In the Volume Type menu for D:, select Create Mirror, and then click Next.
- In the Network end points menu, select Private, and then click Next.
- Select the default, and then click Create to create the mirror for the D: drive (Gen4) or the S: drive (Gen5) volume.
- After the mirror is successfully created, click Next.
- Select the subnet mask that is on the Public interface and click Next.
In the Network Connection menu, select Public, and then click Next three times, accepting the defaults on the next two screens.
If on a Gen5 appliance, repeat steps 4-7 to create a mirror for the S: drive.
In the Volume Type menu for L:, select Create Mirror, and then click Next.
In the Network end points menu, select the Private network, and then click Next.
Select the default on the next screen, and then click Create to create the mirror for the L: volume.
Once the mirror is created successfully, click Next.
Leave the default Backup Priority on the next screen then click Extend.
Wait until the hierarchy is extended, then click Finish.
The extended resource hierarchy should look like this with HA1 Active and HA2 on Standby or Mirroring:
On a Gen5 appliance, the Vol.S_ResTag replaces the Vol.D_ResTag for the following:
LogRhythmApIGateway_ResTag
LRAIEComMgr_ResTag
LRAIEEngine_ResTag
scmedsvr_ResTag
scsm_ResTag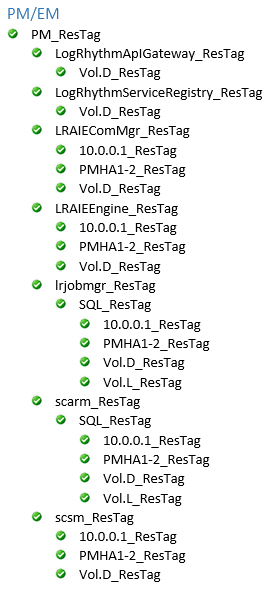
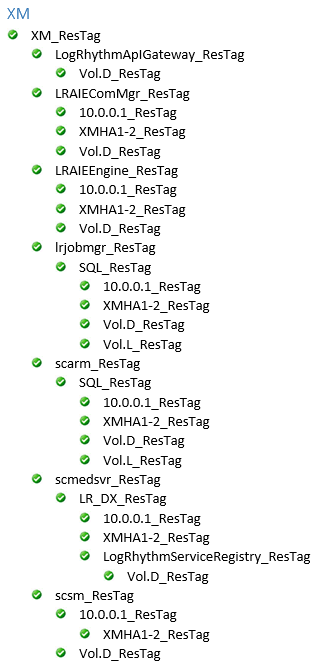
The LRAIEComMgr_ResTag and LRAIEEngine_ResTag resource hierarchies are only displayed if you selected the AIE Enabled check box in the HA Setup tool.

New mirrors require time to synchronize. Failover is not possible until both L: and the D: drive (Gen4) or the S: drive (Gen5) are in a Mirroring state. A Resync state means the data is being duplicated to this volume from the active volume.

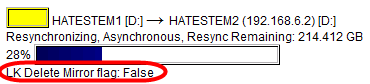
Right-click the active volume and click Properties to view the sync progress.
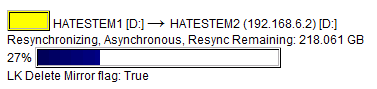
- After the status is Mirroring for all volumes, you may proceed with outage tests. Failure to wait for the sync to complete may result in data corruption.
Associate the DX Cluster ID on Both Nodes
To associate the DX cluster ID on the Primary Node, do the following:
Right-click PowerShell, and then click Run as administrator.
Issue the following command and record the value that is returned: $env:DXCLUSTERID
You use the returned value to associate the cluster ID using PowerShell on the Secondary Node in the next set of steps.
Press Enter to continue.
To associate the DX cluster ID on the Secondary Node, do the following:
Right-click PowerShell, and then click Run as administrator.
Issue the following command: Set-ItemProperty –Path "HKLM:\SYSTEM\CurrentControlSet\Control\Session Manager\Environment" –Name DXCLUSTERID –Value <DXCLUSTERID value obtained on Primary node>
The DXCLUSTERID is case-sensitive and must match between both servers exactly for searches to succeed after a failover.
Close the PowerShell window.
Update Mirror Settings
The default mirror settings created by LifeKeeper Volume Mirroring uses a flag called the LK Delete Mirror Flag, which is set to True by default. The product documentation describes this flag as follows:
The LifeKeeper Delete Mirror Flag controls the behavior during delete of the LifeKeeper resource for the replicated volume. When deleting the LifeKeeper volume resource, if the flag is set to True, then LifeKeeper deletes the mirror; otherwise, the mirror remains.
If you want the mirror deleted when the volume resource is unextended or removed from LifeKeeper, select True.
If you want the mirror to remain intact, select False.
The default is True if the mirror is created using LifeKeeper GUI. The default is False if the mirror is created outside of LifeKeeper GUI.
To preserve data, the LifeKeeper Delete Mirror flag must be changed to False.
Right-click the active volume and select Properties.
Click the Mirror Settings button.
On the first page of the Volume Mirror Settings wizard, click Next, and then select Set LifeKeeper Delete Mirror Flag in the dropdown menu.
Set the value to False and complete the wizard. Repeat the process for the other protected volume.
Confirm the setting on the Properties page.