Configure the Webhook Collector in Axon
Before configuring the Webhook collector in the third-party portal, it must first be setup within Axon.
Add a Webhook Collector
Only Administrators can take this action.
- In the lower-left corner of the main screen, click the Administration cog.
The Administration menu appears on the left side. - Under Integrations, click Collectors.
The Collectors page appears. - In the upper-right corner, click + Add Collector.
The Add Collector Wizard appears. - Select Webhook from the list of collector types.
A list of Log Source Types associated with the Webhook collector appears on the right. - Click Configure.
Enter the following information on the configuration page.
Fields marked with an asterisk (*) are required.Option Description Collector Name * Enter a unique name for this collector. Description Enter an optional detailed description for this collector. Basic Click the Basic tab if you'd like to configure the Webhook collector using basic authentication.
Selecting Basic authentication allows you to configure a Webhook within any third-party cloud platform that allows for Basic auth setups.
In the examples in the next section, SparkPost is the third-party cloud platform used.
Username * Enter a username to be used when configuring the Webhook collector in the third-party portal. Password * Enter a password to be used when configuring the Webhook collector in the third-party portal.
It is highly recommended to simply click the Generate Password button to create a unique and difficult-to-guess password.
Be sure to copy this password into a notepad file for ease of access later.
Token Click the Token tab if you'd like to configure the Webhook collector using token-based authentication.
Selecting Token-based authentication allows you to configure a Webhook within any third-party cloud platform that allows for Token auth setups.
In the examples in the next section, GitLab is the third-party cloud platform used.
Access Token * Enter an access token to be used when configuring the Webhook collector in the third-party portal.
It is highly recommended to simply click the Generate Token button to create a unique and difficult-to-guess token.
Be sure to copy this access token into a notepad file for ease of access later.
Token Prefix Enter the token's prefix value, typically either Bearer or SSWS.
The prefix is included in the request before the token value.
Header Name * Enter the authentication header key to which the prefixed access token will be assigned in the request.
This field auto-populates with "Authorization," which is a typical header key name.
Payload Split Parameter Enter a split parameter to determine the property within the response body that contains the records. The split operation is applied to a response upon receipt.
For example, using the split parameter results splits the response from the results, as shown below:
CODE{ "results": [ { ... }, { ... }, { ... } ] }The Json path of the field from where the split in the array should occur can also be provided:
CODE{ "d": { "results": [ { "Organization": "testo365.onmicrosoft.com", "StartDate": "/Date(1634279627470)/", "EndDate": "/Date(1635147227470)/", "Index": 0 }, { "Organization": "testo365.onmicrosoft.com", "StartDate": "/Date(1634279627470)/", "EndDate": "/Date(1635147227470)/", "Index": 1 } ] } }In the example above, the logs need to be split from the result field. The split value should be provided as "d.__next"
Multiple split parameters can be provided using comma-separated values, such as clicksPermitted, clicksBlocked, messagesDelivered, messagesBlocked
CODE{ "queryEndTime": "2022-01-15T09:24:21Z", "clicksPermitted": [], "clicksBlocked": [], "messagesDelivered": [], "messagesBlocked": [ { "spamScore": 100, "phishScore": 100, "senderIP": "208.86.203.10", "messageID": "<20220115170227.58BE507B5CCBE173@docis.io>" } ] }Finally, if the JSON array appears as a root element then No value should be present in the split parameter.
CODE[ { "actor": { "id": "00u1mwf2vvfH9GCZx5d7", "type": "User", "alternateId": "john.smith@logic.com", "displayName": "John Smith", "detailEntry": null } }, { "actor": { "id": "spr1mwf2qa5zo3IMq5d7", "type": "SystemPrincipal", "alternateId": "system@okta.com", "displayName": "Okta System", "detailEntry": null } } ]Click Connect to test the collector's connection.
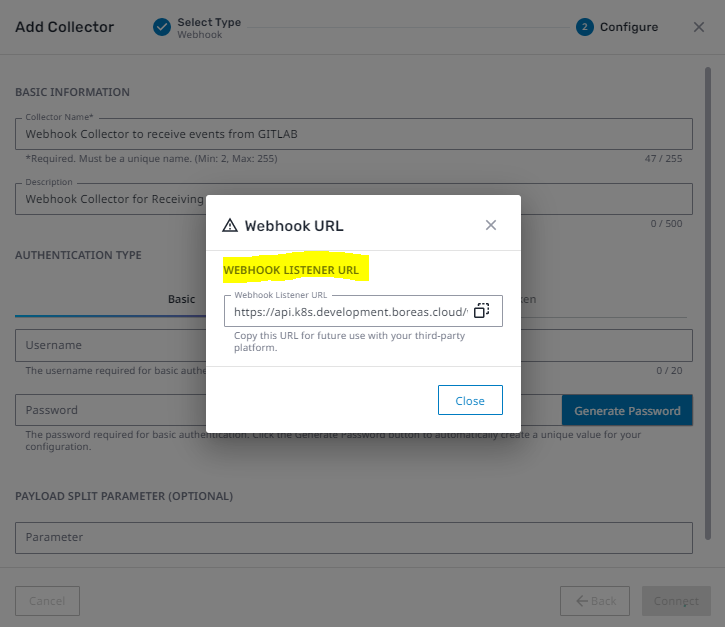
If the configuration is accepted, the Webhook URL pop-up appears.Be sure to copy this URL into a notepad file for ease of access later.